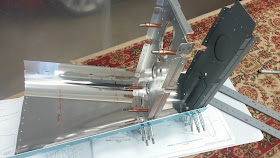
Sect 10-9 Step 2-7 completed: finished deburring edges, holes and smoothed flange facets. Checked fit into Aft Bottom Skin... A-OK! (no fluting needed ...bulkheads were already straight and fit well)
Dimpled the #40 and optional #27 holes for the flush screws installation later (ordered screws and nutplates from Van's today).
Riveted two H.S. Attach Brackets to these two bulkheads w/ 30 universal head size 4-7 rivets. Appreciated using Main Squeeze again (needed to add 3 washers to lengthen reach of Universal die for flange height clearance).
Sect 10-10 Steps 1-3: Next bulkhead sub-assembly includes "step drilling the 5/8" hole for bushing, dimpling #40 holes on flanges, deburring edges and holes, plus smoothing facets on flanges...again. I prefer working each section (bulkhead sub-assembly) as mini-project following instructions in sequence, vs gathering all the bulkhead pieces and deburring, scuffing and priming as major batch. With nice weather, set up outside to spray primer takes only a minute, so small batches are easy


