I've started my adventure to build a Van's Aircraft RV14a. For several years, I've been planning to build an Experimental (homebuilt) airplane - once retired.
But first, I needed to get my Pilot's License. (Kinda key !) So... first things first: I retired March 2014 from Caterpillar - and started flying lessons in the Summer of 2014. Soloed a day after Christmas, and got my Private July 2015. Shop set up, tools acquisition, and practise kits during Fall launched me into my build starting Dec 31, 2015 !

I've chosen to build the RV14a since it's about 10% larger than Van's prior models - so it fits my 6'4" frame well. Van's is well known for great value & outstanding flying qualities. It's been a no brainer decision for me. A tour of their facilities and demo flight in Oct 2013 clinched the deal. My wife - also a pilot - exclaimed after her demo flight "retire NOW so you can build one of these". The RV14a fits my mission of a good compromise between cross country & aerobatics. Plus...I fit, too.

So far, one month into building, it's been rewarding. Very challenging, but certainly a learning experience. The builder community is terrific - as is Van's tech support. I'm finished with the Vert Stab and Rudder (Jan 2016). So... with a 5 month delivery lead time, I've ordered the Quick Build Wings and Fuselage.

I hope this blog assists other new builders, just like several others have been valuable to me. Plus it will serve to document my build step by step. Please drop me a line via the "contact me" form on lower RH margin.
Update: April 2020 relocated to Wickenburg, Az to escape Illinois winters.
Showing posts with label Elevator. Show all posts

Tuesday, May 17, 2016

Empennage

Elevator (1.5 hr )

Elevators are done !  (at least all of Sect 9 build)   Finished today the Molex connectors (geesh, these are tiny) for the Trim Servo.   Installed into Elevator following Steps 1-5 in Sect 9-25.   Powered up via 9 volt battery - to the white leads.  Reverse is simple switching  - and +  from battery.


didn't bother to switch ends for LH and RH for picture

Monday, May 16, 2016

Empennage

Elevator (1 hr )

Counterweights installed (2 in LH, 2 in RH).  Torqued to 42 in-lbs (28 spec + 14 for friction of lock nut per Sect 5-20).  Installed Trim Tab, secured hinge pin w/ .032" safety wire ( I may redo w/ .041" safety wire...tbd)
 

Sunday, May 15, 2016

Empennage

Elevator ( 2 hrs)

My brother and his wife visited this week from California...so no building Tues - Sat.  But lots of fun, including taking him flying for my first time.

Now on Sunday, back to building:  Rolled RH Elevator leading edges top and bottom skins.  Cleco'd, and ready to blind rivet.   Double checked top skin overlapped bottom skin.
broomstick used has convenient "nut" on end...easy to turn with wrench.
 Later during evening, returned to complete with blind rivets.   Looking good !


Tuesday, May 10, 2016

Empennage

Monday     May 9, 2016
Elevator  (2 hrs )

Sect 9-26 - worked on Counterweights to fit up properly.  Trimmed per instructions.   Another builder recommended using chisel to remove layer on backside (2 of 4 only).   It worked, but slow going on first piece.   While my bandsaw with small pitch teeth for metal bound up,  I discovered switching to all purpose larger pitch teeth worked really well to cut off the lead as needed.  Used wood rasp to level and trim to lines.


Rolled leading edges of LH elevator with help from my wife Nancy.  Cleco'd, so ready to do RH next.

Saturday, May 7, 2016

Empennage

Elevators (2.5 hrs )

Nancy and I flew our flying club's C172 from Lacon (C75), Illinois to Effingham, Illinois (1H2) on Friday - just for fun.  Visited Mid-America Motorworks (free - w/ lots of Corvettes), and had a great lunch at the Firefly Grill.

So....I skipped building on Friday, but back at it Saturday.  Now with 3 days curing of the Foam Ribs (Tank Sealant/ProSeal ), did the final Root Ribs & Tip Ribs rivets.  Then the T.E. flush rivets using the "RV14 Safety Pin Squeezing Tool".   Tool is critical for reverse wedge on TE.
 

Thursday, May 5, 2016

Empennage

Elevator  (2 hrs )

continued Sect 9-24 with Step 6-9 (after Priming cover and C Channel supports) for Pitch Trim Servo Assembly.   No "slop" in clevis pin to pushrod...a good fit.

Step 4 included Labels onto Trim Harness at each end, and trimming corners of Molex connector so fits through the bulkhead bushing.   Also applied silicone to seal end of Molex connector.

Wednesday, May 4, 2016

Empennage

Elevator  ( 1 hr )

Sect 9-24, Step 1 & 2:  Bent hinge pin to nest into channel at Inboard end of LH Elevator.  Relatively easy to bend this "wire" (vs piano wire I've used before on R/C planes which is heat treated and tends to break at sharp bends).  Drilled 1/16 inch hole adjacent...ready to safety wire once Trim Tab is actually installed.

Jumped ahead slightly to Step 5:  Pitch Trim Servo Assly.   For the #27 size holes, used #6 screw dimple dies (tested first with sample material same thickness...screw head fits well).  Then Countersink six  #40 holes that attach the support C-channels.  I first tested depth on sample material (0.032")...key since thinner material than typically countersunk.  Happy with results.

Tuesday, May 3, 2016

Empennage

Elevator ( 2 hrs )

Hooray !  Sect 9-23 Steps 1-10.  Successfully bonded all 8 Foam Ribs into LH and RH Elevators.  Added TE to each, using the double sided tape process.  Just cleco'd for now while "tank sealant" (Pro Seal) cures for couple days.  

Used lots of weight -everything but the kitchen sink on boards to compress top skin onto foam ribs and bottom skin.  Even used my C-Frame, and a few bricks too.

Monday, May 2, 2016

Empennage

Elevator  ( 2 hrs )

Sect 9-22 Steps 2-4 for LH Elevator - Outboard close out done.  Finished remaining Rear Spar rivets w/ RV10 bucking bar (those left open to enable lifting skin for outboard riveting access).  Last time I need this special bucking bar...but sure works great.  


I'm glad I recognized Skins go over Counterbalance Skins. (Van's has bold text statement in later page of the Elevator build...but key was knowing this during original assembly with clecos.  Good to read ahead ! )     Fit is "flush" - better than I'd anticipated with this overlap.

Sunday, May 1, 2016

Empennage

Elevator  ( 2 hrs )

Sect 9-22 Steps 6-8:  Rh Elevator Outboard close out done.  Several different lengths of rivets kept me checking instructions frequently.    Two rivets are reached via lifting open the Skin and inserting the bucking bar inside.  

I found easiest to do with Elevator set as shown in picture below... instead of from bottom and top simultaneously.  

Finally got to squeeze in all the rivets along Front Spar on top and bottom.   Tomorrow I'll do the LH Close out.  Soon...bonding in Ribs and TE.

Saturday, April 30, 2016

Empennage

Elevator  (3.5 hrs )

Big day today....joined Front Spar with Tips to the Skins, etc. It's been a long journey for the Elevators (seems as long as the Rudder + Vert Stab + Horiz Stab combined...)  
Bottom side LH Elevator...Front Spar installed.  "Stored" while work on RH side...
Sect 9-20, Steps 7-9: Riveted LH and RH Front Spar Assly's into Elevator Skins at Ribs with 18 blind rivets each side.  Very satisfying to have perfect alignment of all holes.

Sect 9-21, Steps 6-8: jumped one set ahead to complete Inboard Close-out of RH Elevator, since already on the table.  Tricky 2 rivets to E 921 Gusset - requires lifting corner of skin to reach shop ends.  My wife's smaller hands were really helpful.  Thanks Nancy !  
RH Inboard Close-out...done
 Steps 1-5:  Back up one set of instructions to do LH Elevator Inboard Close-out.  Again, several challenging rivets requiring lots of patience.   But each time figured out best way to position bucking bar (even one time able to use Main Squeeze to reach inside).  

Started Sect 9-22, Step 1 and Step 5 riveting Shear Clips to LH and RH Outboard Tips.   Tiring work today due to many different set ups and tools, and lots of reading and re-reading to be sure understood instructions and process expected.

Friday, April 29, 2016

Empennage

Elevator  (3 hrs )

Sect 9-19, Step 3:  LH & RH Elevator Skins top and bottom cleco'd together at Ribs...to blind rivet soon.   Sect 9-20, Step 1-4: Get to try out RV10 Special Bucking Bar  (borrowed from Terry Moushon, builder RV10    Thanks Terry !)  After shimming to prevent any deformation of TE skin "reverse bends", used special bucking bar to rivet Rear Spar.


Instructions have you start with LH Elevator, since those are on bottom (any oops will be less visible).   Good idea, but whole procedure was much easier than I'd feared.  Just insured bar was correctly positioned for each rivet.   Both LH and RH Elevators are A-OK.

Step 5-6:  Blind riveted Top and Bottom Ribs to each other, joining Elevator into an assembly for Left, and one for Right.   Sure was important to use extension handles on rivet tool !   I used cardboard under tool also, to prevent any "dings" to skins when each rivet "pops".

Wednesday, April 27, 2016

Empennage

Elevator ( 3 hrs )

Right Rear Spar riveted to Right Bottom Skin per Step 4 & 5 - with some exceptions.  Then Sect 9-18, Finished Right Bottom Skin via back riveting Ribs.

Sect 9-19, Step 1 Left Bottom Skin - 5 Ribs, since 6th is part of Trim Reinforcement Doubler.   Riveted Trim Access Reinforcement & Doubler Brace while adding final 2 Nutplates.   Note:  I add the machine screw during riveting to insure alignment (these are flush, so no interference, etc).


Step 2 Back Riveted 6 Ribs to Right Top Skin.  Started Step 3 - cleco'd LH Top & Bottom Skins with Ribs and Rear Spar so ready tomorrow to blind rivet top and bottom together.  It's beginning to look like an elevator!

Tuesday, April 26, 2016

Empennage


Elevator ( 4 hrs )

Sect 9-17, Step 3:  Completed rivets to Ribs & Shear Clips to LH and RH Rear Spars.  

Sect 9-18, Step 1 & 2: Primed all 4 Skins inside surface along rivet lines and similarly scuffed zones (only).    Removed tape from zones for bonding Foam Ribs and TE later (see pic below)

Then riveted Forward Hinge to Rear Spar & Top Left Skin.

Temporarily assembled Trim Tab hinge to confirm smooth operation.   Looks and works great !


Step 3:  Back Riveted Ribs to LH Top Skin.


Step 4- 5:  Right Rear Spar riveted to Right Bottom Skin.  Careful to mark locations not to be riveted at this time, too.  Plan to back rivet Ribs to this Skin tomorrow....

Monday, April 25, 2016

Empennage

Elevator ( 2.5 hrs )

Sect 9-17, Step 1:  Assembled Counterbalance Skin to Tip Ribs with 50 rivets each .  Step 2:  Riveted RH and LH Elevator Horns to Front Spar & Root Ribs.   Coming along !


So far I've kept correct orientation:  top vs bottom, left vs right. 
Takes double checking instructions & drawings ! 

Sunday, April 24, 2016

Empennage

Elevators  ( 1hr )

Sect 9-14, Step 7:  Double Flush Riveted Trim Tab T.E. (after 3 days of curing tank sealant/adhesive for Foam Ribs).  Used RV14 Safety Pin Squeezing Tool to cope w/ TE wedge reverse angle to rivet 426 (flush) 3 - 4.5.  Cost me $25, but it makes this riveting easy.    Step 8:  Finished Trim Tab to install 6 blind rivets in close out tabs.   Looks great!

Saturday, April 23, 2016

Empennage

Elevator (1 hr )

Finished Sect 9-16, Step 3 w/ rivets attaching LH & RH Tip Ribs and Root Ribs to the Front Spars.
I successfully used Main Squeeze for 2, but ultimately used rivet gun for other 2 rivets.

Friday, April 22, 2016

Empennage

Elevator  (3.5 hrs )

Sect 9-16, Step 3:  Deburred edges, Final Drilled (reamed) then deburred  all #30 holes on 4 E910 Hinge Reinforcement Plates.  Primed these prior to riveting to L & R Front Spars.  Added 4 K1000-6 nutplates that will anchor swivel bolts acting as hinges between Elevator and Horiz Stab. Instructions spec'd 470 4-6,  but first one had to be replaced after it curled as I began to squeeze.  Closer examine with gauge showed too long !   Checked alternate  -5 rivets, but gauge showed too short.  So I simply hand ground eight 470  4-6  rivets by just .5 to  -5.5 lengths.  These were perfect.
Front Spars w/  Hinge Reinforcement Plates and nutplates.

Jumped to Sect 9-17, Step 3 to rivet Shear Clips and Gussets to LH and RH Rear Spars, and cleco'd 12 Ribs ...to complete next session.  Gotta go mow since grass is growing like crazy this spring.

Thursday, April 21, 2016

Empennage

Elevator ( 2.5 hrs )

Sect 9-15, Steps 1 & 2:  Prepped 4 Skins fro bonding Foam Ribs (8 places) and T.E.'s.   Sect 9-16, Steps 1 & 2:  Riveted Gusset to LH Root Rib (once again, proving critical to permanently label parts for orientation.  I masked over markings in small zone with undisturbed Alclad when spraying primer on parts that will be difficult to differentiate from duplicates, etc )  

Riveted E-903 and E-904 Tip Ribs to each other for Left and Right sides.  Two flush rivets are located where counterweights will be attached.  All others are 470 Universal style.   Oriented so shop ends will be covered by composite tips at final assembly.

Wednesday, April 20, 2016

Empennage

Elevator ( 4.5 hrs )

Sect 9-14:  Spar riveted to Bottom Skin, and riveted 2 Horns.  The specified 3.5 rivets were slightly long, so had to be careful with alignment while starting each shop end (back riveting) to prevent curl over.  
bottom skin with horn attached


Prepped for bonding T.E. w/ 3M UHB double sided tape.   Also cleaned scuffed zones for bonding Foam Ribs.   Steps 3-6 included first time using Tank Sealant (otherwise known as Pro Seal).  As expected - kinda messy, high viscosity,  tacky, and smelly.  But planned ahead by double layering latex gloves and plenty of paper towels handy.  Not so bad as some builders have noted, but they again I wasn't sealing lots of ribs, rivets, etc in the wing fuel tanks.

Pro Seal coating Foam Ribs, ready for Top Skin.
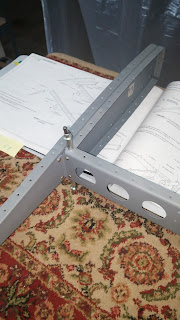
Attached front half Hinge...great alignment. (Next: flip over, weights added for 2-3 days)

Really pleased with straight, tight layering and flush rivets.  No warps or waviness, but I haven't riveted T.E. -- since this assembly first needs to fully cure under weights for 2-3 days.    Note:  good idea from other builders to wear extra layer of gloves  --  removing one layer half way through process help keep the trim tab (and me !)  free of sealant except where expected.  

Sect 9-15:  Masked around locations for Foam Ribs on main Skins - then scuffed with 150 grit sandpaper.  After cleaning, masked those areas to prepare to spray primer (only intend to spray specific areas where working on holes, etc has damaged Alclad protection ).