I've started my adventure to build a Van's Aircraft RV14a. For several years, I've been planning to build an Experimental (homebuilt) airplane - once retired.
But first, I needed to get my Pilot's License. (Kinda key !) So... first things first: I retired March 2014 from Caterpillar - and started flying lessons in the Summer of 2014. Soloed a day after Christmas, and got my Private July 2015. Shop set up, tools acquisition, and practise kits during Fall launched me into my build starting Dec 31, 2015 !

I've chosen to build the RV14a since it's about 10% larger than Van's prior models - so it fits my 6'4" frame well. Van's is well known for great value & outstanding flying qualities. It's been a no brainer decision for me. A tour of their facilities and demo flight in Oct 2013 clinched the deal. My wife - also a pilot - exclaimed after her demo flight "retire NOW so you can build one of these". The RV14a fits my mission of a good compromise between cross country & aerobatics. Plus...I fit, too.

So far, one month into building, it's been rewarding. Very challenging, but certainly a learning experience. The builder community is terrific - as is Van's tech support. I'm finished with the Vert Stab and Rudder (Jan 2016). So... with a 5 month delivery lead time, I've ordered the Quick Build Wings and Fuselage.

I hope this blog assists other new builders, just like several others have been valuable to me. Plus it will serve to document my build step by step. Please drop me a line via the "contact me" form on lower RH margin.
Update: April 2020 relocated to Wickenburg, Az to escape Illinois winters.
Showing posts with label Engine. Show all posts

Saturday, May 18, 2019

Engine

Fuel System Leak resolved...finally! ( 3 hrs )

Continued trying to find fuel system leak (not holding 30 psi air pressure).  Used "Mega Bubble Leak Detector" (blue fluid).  Supposed to detect micro leaks.  But I tested first on a joint gradually loosened - didn't seem much better than simple soap bubbles (maybe identifies leak at 1/2 rate, but my rate is approx 1/10).  Decided to try anyway...first re-checking firewall forward, then behind firewall.  When I added the liquid to the the pipe thread joint between filter and boost pump - I actually heard a light hiss with my ear about 6" away.  Never produced bubbles.  Neither did soap bubbles over last two days numerous times.   This was same joint I already re-did couple days ago.  But I tightened further another 1/3 turn...and Tah Dah !   Holding 30 psi for 2 hours !   Probably should have started with a mechanics stethoscope.  I now hate pipe thread joints !   Next, I started installing interior panel per Sect 43.  Installed Crotch belts for 5 point harness.
Installed inspection panels in baggage area, then added Carpet
from Flightline Interiors.  Perfect fit!

Installed wall panels and armrests from Flightline Interiors.
Added Crotch Straps.  Panels on floor haven't been screwed
down yet.

Friday, May 17, 2019

Engine and Avionics

Final Mounted Snorkel, LED interior lighting, and STILL can't find Fuel System Leak ! ( 4 hrs )

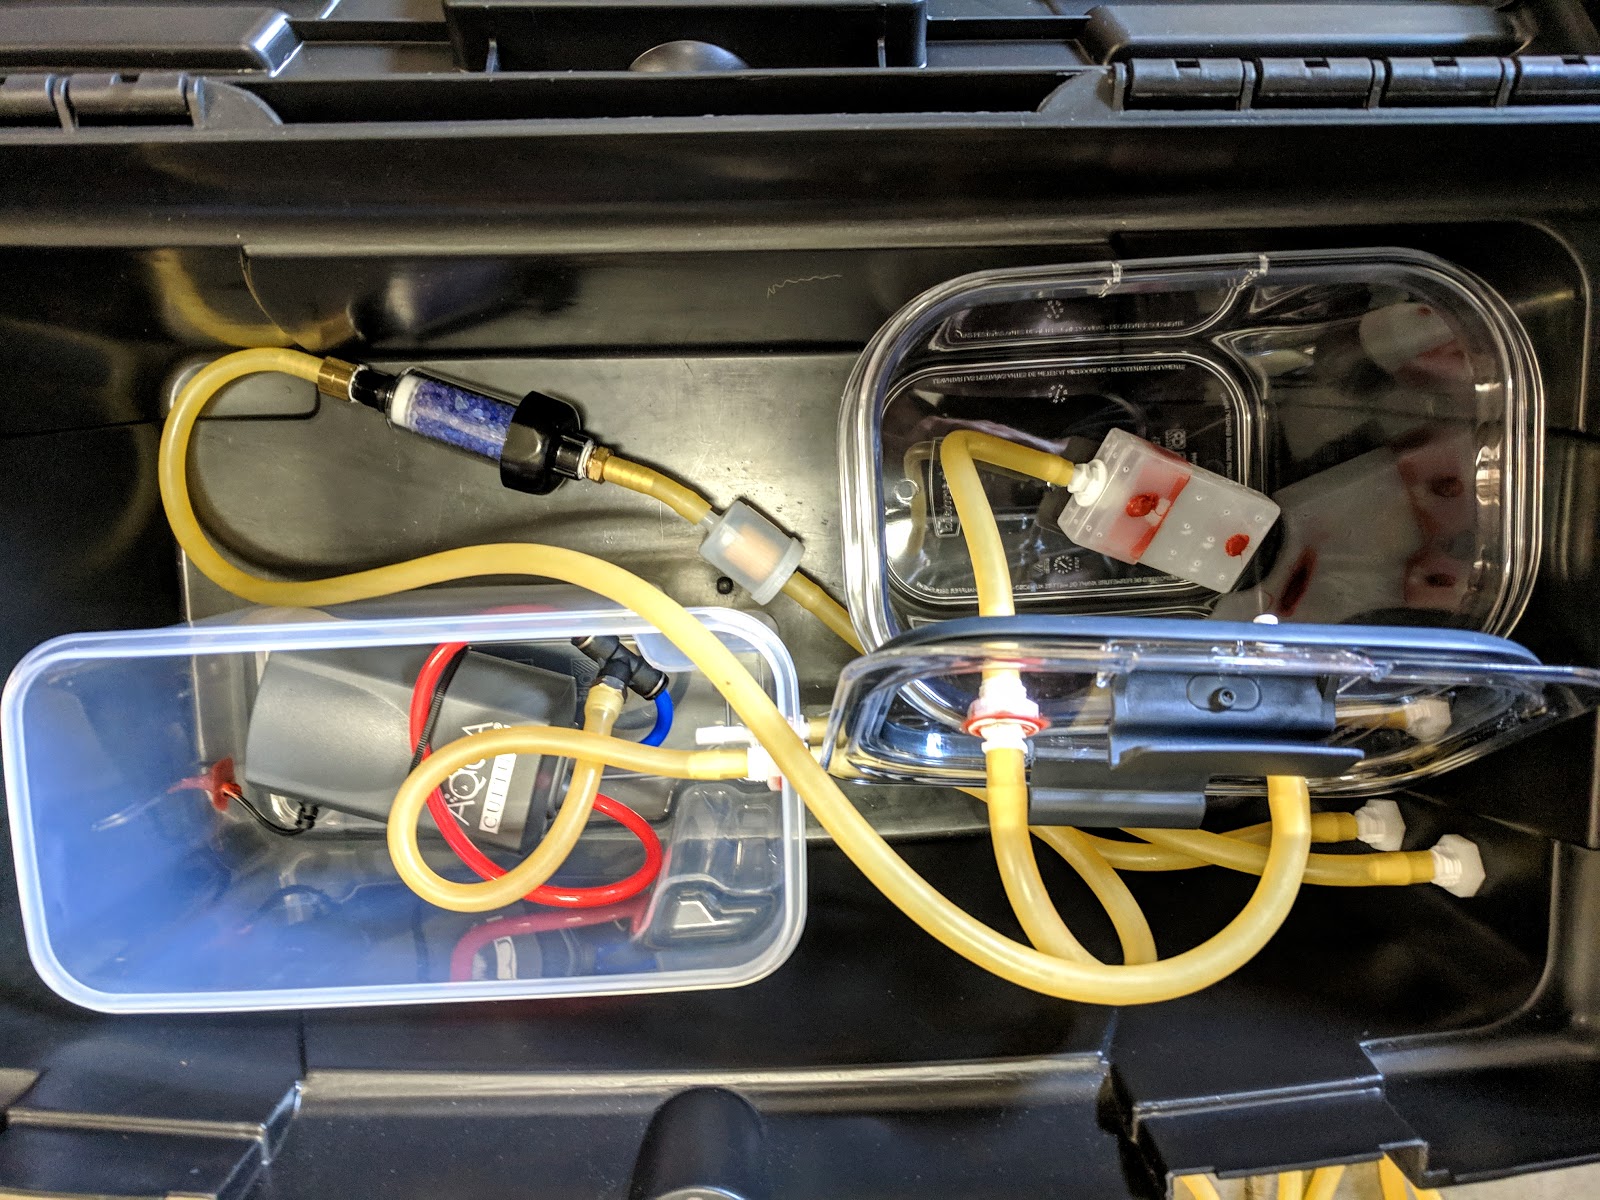
Removed Snorkel (air intake plenum) from fuel servo so I could remove tape at throttle interface (added more than year ago to keep engine "sealed").  Tightened four 1/4" bolts, then safety wired.  Ref 47-17 and 47-22, Step 15.  Also Configured Lighting in G3X for Red and White LED strips on canopy.  In Config mode, selected Cockpit Lighting, then chose PWM Lighting Bus 1, and Input 2 for White LED.  Set 0% at 0.0v, and 100% at 12V.  Same for Red LED, except Bus 2, Input 1.  (After pics taken, I revised setting 30% at 7v for each, so lower portion is easier to modulate...ie non-linear.  Pic shows original linear input vs output plot).    Still haven't found tiny leak in fuel system (approx 15 psi in 30 min) ...after another 3 hrs with multiple doses of soap bubbles .  Connected test equip at input to fuel filter, and got same leak rate - proving fuel valve is NOT source of leak.  Re-checked thoroughly every joint from Wing connection to fuel servo...with lots of soap bubbles.  NO joy!  Totally encapsulated w/ soap bubbles the mechanical fuel pump, electric fuel pump, and  Red Cube fuel transducer - trying to detect poor gasket, crack, etc. No joy.    So I loosened a connection on test equip, and was surprised although covered in soap bubbles - it didn't "indicate" a leak until I opened a much higher rate of 1 psi drop per 1-2 seconds !  Vans product support wasn't much help today...indicating soap bubbles should work. (Sterling did suggest dunking entire fuselage in my swimming pool, and look for bubbles ...ha !)  Another builder (Bill Lane, who's been very helpful) suggested I purchase gas leak detection "blue" fluid (available in hardware stores).  It may work better.   One advertises capable of magnifying micro-gas leaks as small as 0.65 oz/year into visible foam "cocoons".  Wow!  IF this doesn't work, I'll have to wait until Wings attached, fuel tanks connected - so I can test for leaks with aviation fuel.  VAF has tips to use white paper towels at connections, to show the blue stains from dye in avgas.
blue tape over drainage hole in plenum...with
hanging portion to insure removal prior 1st start.
 

 Red LED for night flights ....dimmed to medium intensity

White LED...good for general purpose in hangar, etc 
Red and White dimmer switches are in upper LH corner of panel

with Canopy raised, serves as overall interior lighting. 
This is at less than 1/2 intensity

Spent hours covering joints in soap bubbles,
inspecting w/ lights and mirrors.  No joy...yet.


Thursday, May 16, 2019

Engine and Avionics

EGT sensors connected ( 2 hrs )

Per Sect 48-07,  Steps 1-3 completed wiring connections to 4 EGT sensors.  Added safety wire to hose clamps per Alcon Tempest instructions per their recommendation.

front Right EGT sensor connected
back Right EGT sensor prior  pulling
protection sleeve over connections

Overall pic of Right side.  ( note: Spark plug wires not
connected for LH magneto...still have desiccant plugs installed)

Left side.  ( The automotive plugs are installed on bottom
 on this side for PMAG electronic ignition)

Wednesday, May 15, 2019

Engine

EGT sensors (and more Fuel System leaking ? )  ( 3 hrs )

Back to trying to find leak in Fuel System !  At first, thought yesterdays leak discovered and repaired completely solved Fuel System "leak"...but after 1 hr, the 30 psi air pressure slowly dropped.  So today repeated - and now won't hold pressure for more than couple minutes.  Redoubled efforts with lots more soapy suds...thoroughly covering every possible joint or leak path -- No joy.  To confirm not test equipment, I positioned Fuel Valve to OFF...and it held pressure.  So considering if internal leak in valve from LH to RH side. But tested for air transfer to RH side (tube added to fuselage fitting, ending under water...no bubbles!) -- again No joy.   So tomorrow I'll try to isolate (remove hose to engine fuel pump, cap and test that section)...with more soap bubbles.   Meanwhile installed all 4 EGT sensors Type K thermocouple (from Garmin G3X sensor kit, Alcor Tempest #86255, which is Garmin #494-70001-00).  Reamed holes (pleased already drilled in exhaust tubes) w/ #30 reamer since press fit.  Need to finish wiring connectors, add safety wire.
re-checking for leaks in fuel system...
getting frustrated....total immersion seeking possible leak
in "red cube" fuel transducer itself, as well as connections


EGT sensor installed, still need to connect wiring.
Sensor is press fit into #30 hole...so tight and leak free

Left side  (not yet connected to brown thermocouple wires

Right side
Added pic of sensor for reference.

Tuesday, May 14, 2019

Engine

Exhaust and Fuel System ( 2 hrs )

Completed Heating System w/ last DG-12 adel clamp on engine mount tube, attaching DG-32 holding 2" SCAT hose to LH Vent.  Finally...yay!  Repeated 30 psi air pressure leak test of LH Fuel System (I ordered/received AN 6 sized cap for RH side to insure not leaking during test).  Using soap suds, discovered tiny leak between Fuel Pump and Fuel Filter on pipe threads.  Disassembled, re-applied thread sealant - and NO leaks for 1 hr.
2" SCAT hose routed to LH Vent.  Clamps
position hose clear of  potential rub points

Discovered tiny air leak at pipe threads during pressure
 test (center of pic).  Bubble grew over couple minutes. 
Removed inline filter from Fuel Pump, re-applied
 pipe thread...no leak.

Monday, May 13, 2019

Engine

Exhaust ( 3 hrs )

Installed lock washers under Exhaust flange nuts, & torqued to 190 in-lbs per 48-03, Step 7 & 8.  Needed special 1/4" drive, 1/2" flex socket -- only way to fit onto nuts since exhaust pipe clearance is minimal (VAF has posts noting other builders found same solution.  Surprised Vans instructions don't call out this tool requirement)  Added Sniffle Line Assly per 49-18, Steps 1-6.  Required adding Bottom Cowl Support Bracket plus couple more adel clamps.
1/4" drive, 1/2" flex socket barely fits...
to tighten exhaust flange nuts
Added heat shields in 3 locations


bottom view of heater 2" SCAT hose behind
engine toward LH vent
Sniffle Line Assembly installed.  Yellow cap has blue tape to insure I remove prior to 1st  engine start 

Saturday, May 11, 2019

Engine

Heat Muffs, etc ( 3 hrs )

Completed Step 6, Sect 48-05 - 2" Vent Tee.  Limited space to 1st install two Adel clamps to engine mount tubes, then very large Adel Clamps around 2" Vent.  Used safety wire to hold clamps in position.  Overall took a lot of time to get positioned correctly - and lots of various tools!   Glad that's done !
Using tool to hold clamp closed so I can
hold closed w/ safety wire
In the end, I used many tools to get  'er done.


close up showing clamps secured
And overall shot showing 2" SCAT hose routing 

Friday, May 10, 2019

Engine

Heat Muffs ( 3 hrs )

Installed Heat Muff assemblies per Sect 48-04, Steps 1-6.  Added couple of the SCAT 2" hoses per 48-05.
1 of 2 heat muffs added.

Both heat muffs added, & interconnecting SCAT hose installed

hose connected for air intake 

Wednesday, May 8, 2019

Engine

Exhaust install continued ( 2 hrs )

Installed Forward Exhaust Hangar assembly per Sect 48-03, Steps 1-6.   Also started working on heater install, with 2" SCAT hoses, etc.

Hangar from Left rear corner
engine sump to clamp around left
exhaust prior to joining tailpipe.
2" SCAT hose clamped to Right Vent on firewall.

Tuesday, May 7, 2019

Engine

Exhaust installation ( 4 hrs )

Installed Halon fire extinguisher (A344T, 1.25lb 1211 Class B C)  in baggage area  - where pilot can easily reach on wall behind passenger.   Installed LH and RH "Stick to Torque Tube Pushrods" per Sect 41-07, Step 1.  Installed Exhaust per Sect 48-02, Step 4 & 6,7.  Used Permatex #77124, Nickel Anti-Seize Lubricant on slip joints.  Attached Engine Dryer to insure engine interior remains low humidity since opened to install exhaust.  With both 'spark plug' desiccants and circulating dry air, believe I have protection against corrosion.
Halon fire extinguisher in baggage area.
Amerex A344T, 1.25lb 1211 Class B C
LH forward Exhaust added (taped over holes for EGT sensor).  Cover still on rear exhaust port.


From under LH side with rear exhaust added. 
Note: Heat shields in several locations not yet added.
From under tailpipe


Exhaust joining Y for Tailpipe.

Monday, May 6, 2019

Engine

Pressure test fuel system ( 4 hrs )

5 lb can of white desiccant arrived, used approx 1/2 in engine dryer container.  Ready to use now.   Completed prep of 2" SCAT hoses for heater per Steps 1-5, Sect 48-05.   Checked left fuel system w/ Valve in Off position, from Wing Root to Servo for leaks.  Held 30 psi air pressure as well as no signs leakage with soap bubbles at connections.  Repeated for right side.  When I turned fuel valve to Left tank, I found gradual loss of pressure over 30 mins.  I soaped all joints...can't find any leak point with soap bubbles.   Going to repeat soon and inspect again...Need to cap off opposite side at Wing Root to insure no internal leaking from Left to Right side inside Fuel Valve.
Approx 1/2 of 5 lb can of white desiccant added to
container in Engine Dryer

Prepped 2" SCAT for heater system

Searching for air leak while pressurizing
fuel system. (pic taken after bubbles drying out)

More checking for air leak while testing fuel system to 30 psi. 

Wednesday, May 1, 2019

Engine

Engine Dehumidifier /Dryer  ( 7 hrs )

Built Engine Dryer using recommendations per Bill Lane (local builder of RV 7) and several example posts in VAF.  This will minimize risk of corrosion inside engine if not run weekly (moisture accumulates from combustion).  Will connect the dry air output at Dipstick, with return air captured via Breather.   Uses aquarium pump (must be in air tight container itself with only air from Breather connected), to move air through about 2 quarts of desiccant.  I'll use white desiccant (lower cost) followed by small container of blue desiccant (color changes when saturated).  Small engine fuel filter insures clean air returned to dipstick.  I've also been working on 2 Wing Jacks, using 3 Ton hyd rams from Harbor Freight (also per examples in VAF)...pics soon.
Tool box services as container.  Original plug Lycoming ships
 engine with used to insert dry air into engine. Return air from
 Breather.  (small red caps keep clean until using)

Aquarium air pump is in air tight container so only return air from
engine is cycled.  Desiccant container also must be air tight.  Blue
 desiccant in "inline desiccant" vessel to provide indicator when
primary "white" desiccant is saturated.  Small filter just
prior to exit to engine insure "clean" air.

Lots of latex tubing (vinyl will get stiff in colder weather).  Pump
 has 2 outlets, so combined via T fitting.   Created distribution
 box for air inside desiccant container using small
plastic box (or drill alum tube, etc)

Saturday, April 20, 2019

Firewall Forward Kit

Exhaust Installation ( 2 hrs )

Continued Exhaust install per 48-02.  Added Hangar Links.  Adjusted angle of Hangar Angles to 123.5 deg using provided template.   Step 4 required disconnection of Nose Gear Link (ref Sect 40A-06). to install Tailpipe.  Fortunately, another builder documented this - Vans doesn't describe.  I tried w/o doing 1st, but seemed impossible otherwise.  Used engine hoist to release load on nose wheel.  Tailpipe installed and gear re-assembled.  Ready to add remaining exhaust tubes, but trying to do as much as practical prior to opening engine to air/moisture - since 1st start is likely few weeks away.
removed bolt holding nose gear link...with engine hoist
lifting load entirely off nose wheel

tah dah ! 
Tailpipe installed on hangars in central tunnel

re-attached support link to Nose Gear. 
Ready to add exhaust tubes forward

Thursday, April 11, 2019

Transition Training

Transition Training with Mike Seager

Flew commercial to Portland, Oregon, then drove an hour northwest to Vernonia, Oregon.  Stayed at Carpenter Guest House B&B (carpentersguesthouse@gmail.com, 541 961 8601).   Met Mike Seager for my Transition Training (email rv6cfi@hotmail.com, 503 709 4075) at Vernonia Muni Airport (05S).  The week prior, Mike notified me Vans RV-14A would NOT be available (until June 3! ) due to scheduled updates, etc.  Discovered the RV-14 (taildragger) instead had been reserved back Feb 1.  I quickly received confirmation from Falcon Insurance that the underwriter Global was OK w/ using Vans RV-7A for my training.  Mike assured me the 7A flies nearly identical to RV-14A.   We flew Thurs & Fri, April 11-12 in morning and early afternoon.  Rains and low ceilings made flying over  mountains exciting enroute to Scappoose (KSPA) and back.  Lots of pattern work at KSPA.  I gradually got used to CS prop and high sink rates on approach (vs C172).  Abundance of power is understatement -- takeoffs were more like launches!  Mike's a great instructor ( 22,500 hrs mostly in RVs).   On Saturday, I had time prior to flight home to visit Evergreen Aviation Museum ( about 1.2 hrs south of Portland)...the Spruce Goose is amazing!
Mike Seager getting RV-7A ready.

Rare partial blue sky...it's damp in Spring in Oregon!

Spruce Goose.  Over 300' wingspan. 
You could stand up inside wings.  8 engines each 3000 hp.

One of many planes of all eras on display.