I've started my adventure to build a Van's Aircraft RV14a. For several years, I've been planning to build an Experimental (homebuilt) airplane - once retired.
But first, I needed to get my Pilot's License. (Kinda key !) So... first things first: I retired March 2014 from Caterpillar - and started flying lessons in the Summer of 2014. Soloed a day after Christmas, and got my Private July 2015. Shop set up, tools acquisition, and practise kits during Fall launched me into my build starting Dec 31, 2015 !

I've chosen to build the RV14a since it's about 10% larger than Van's prior models - so it fits my 6'4" frame well. Van's is well known for great value & outstanding flying qualities. It's been a no brainer decision for me. A tour of their facilities and demo flight in Oct 2013 clinched the deal. My wife - also a pilot - exclaimed after her demo flight "retire NOW so you can build one of these". The RV14a fits my mission of a good compromise between cross country & aerobatics. Plus...I fit, too.

So far, one month into building, it's been rewarding. Very challenging, but certainly a learning experience. The builder community is terrific - as is Van's tech support. I'm finished with the Vert Stab and Rudder (Jan 2016). So... with a 5 month delivery lead time, I've ordered the Quick Build Wings and Fuselage.

I hope this blog assists other new builders, just like several others have been valuable to me. Plus it will serve to document my build step by step. Please drop me a line via the "contact me" form on lower RH margin.
Update: April 2020 relocated to Wickenburg, Az to escape Illinois winters.

Wednesday, May 1, 2019

Engine

Engine Dehumidifier /Dryer  ( 7 hrs )

Built Engine Dryer using recommendations per Bill Lane (local builder of RV 7) and several example posts in VAF.  This will minimize risk of corrosion inside engine if not run weekly (moisture accumulates from combustion).  Will connect the dry air output at Dipstick, with return air captured via Breather.   Uses aquarium pump (must be in air tight container itself with only air from Breather connected), to move air through about 2 quarts of desiccant.  I'll use white desiccant (lower cost) followed by small container of blue desiccant (color changes when saturated).  Small engine fuel filter insures clean air returned to dipstick.  I've also been working on 2 Wing Jacks, using 3 Ton hyd rams from Harbor Freight (also per examples in VAF)...pics soon.
Tool box services as container.  Original plug Lycoming ships
 engine with used to insert dry air into engine. Return air from
 Breather.  (small red caps keep clean until using)

Aquarium air pump is in air tight container so only return air from
engine is cycled.  Desiccant container also must be air tight.  Blue
 desiccant in "inline desiccant" vessel to provide indicator when
primary "white" desiccant is saturated.  Small filter just
prior to exit to engine insure "clean" air.

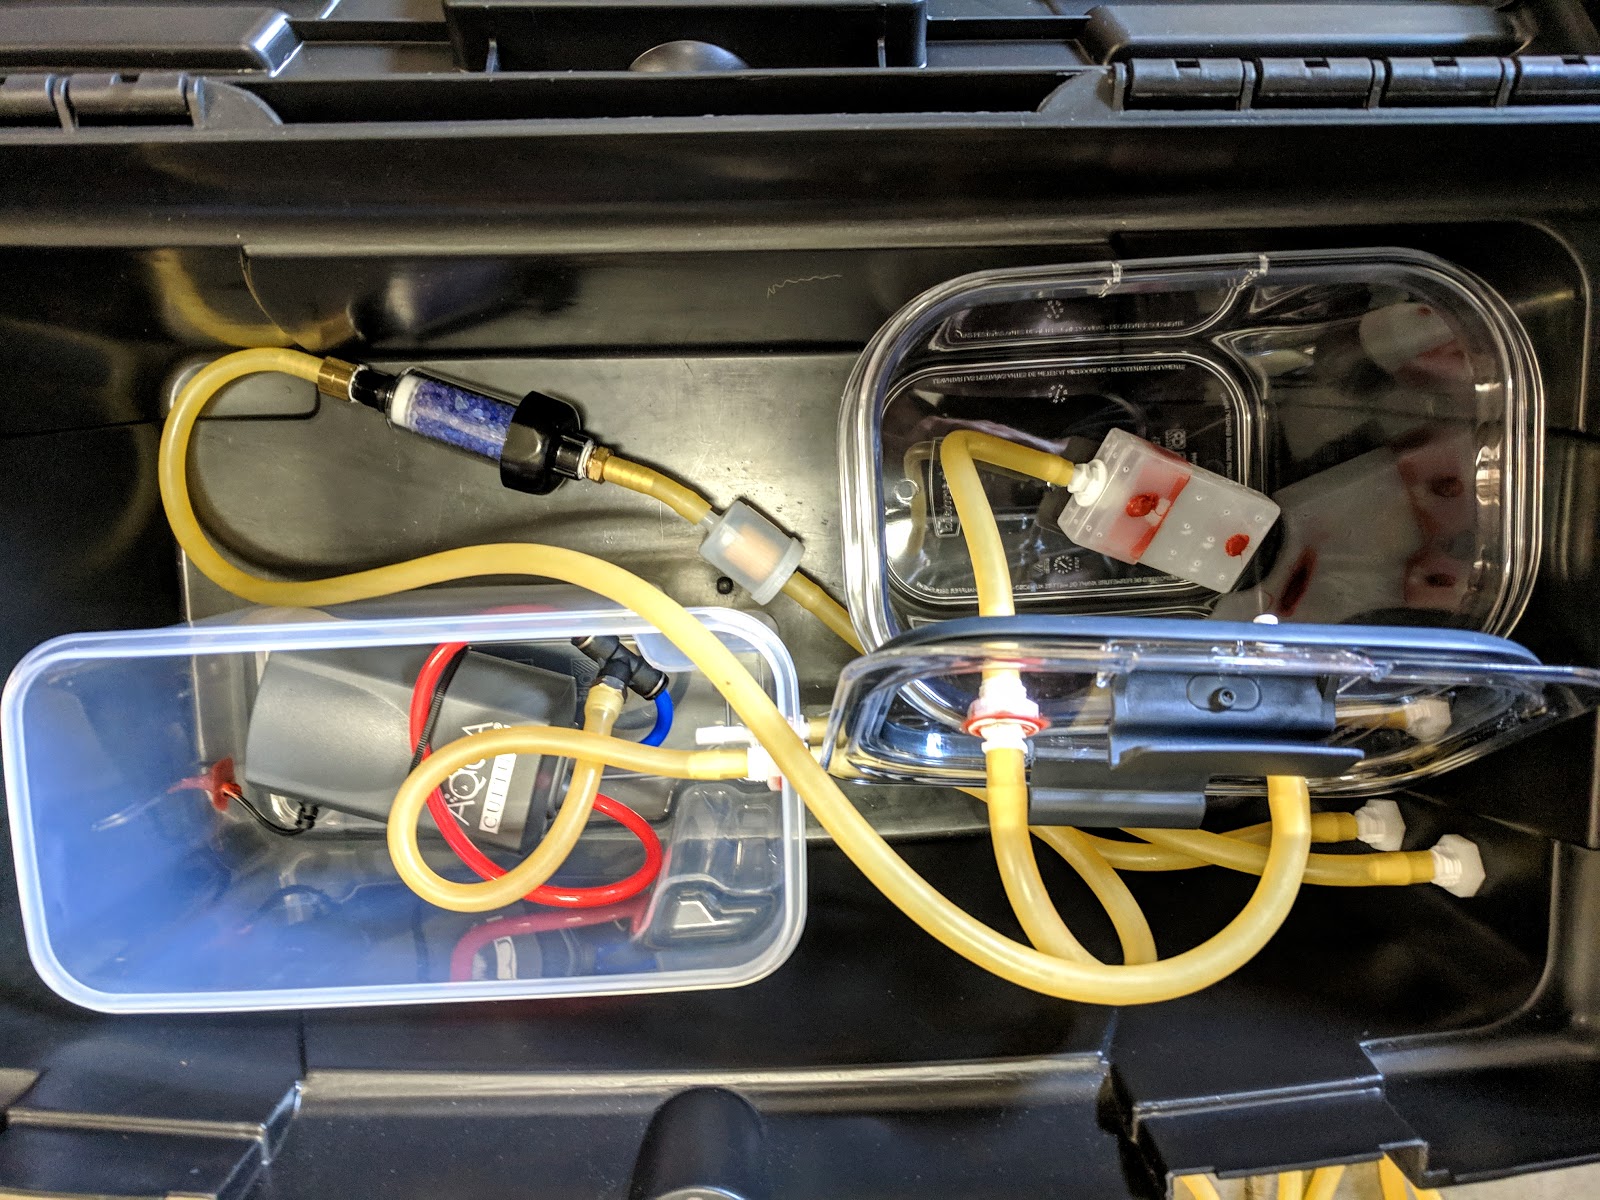
Lots of latex tubing (vinyl will get stiff in colder weather).  Pump
 has 2 outlets, so combined via T fitting.   Created distribution
 box for air inside desiccant container using small
plastic box (or drill alum tube, etc)

Saturday, April 27, 2019

Finish Kit and Avionics

Misc, fire extinguisher & hangar ( 3 hrs )

Trying to complete as many tasks as feasible prior to moving to hangar.    Checked all 5 sets of  Kit instructions for any "loose ends".  A few final torques, replaced temporary nuts, etc...but nearly all I can do has been completed. Still lots of post-its on pages identifying actions once Wings and Tail are assembled onto Fuse.  Still pending Exhaust assembly as last step (to keep engine closed from moisture as long as practical).   Made 2 pairs of wheel chocks from scrap 2x4's.  Ordered Amerex A344T, 1.25lb Halon 1211 Class B C fire extinguisher (reviewed VAF for recommendations, pros/cons) for cockpit.   Expensive at $199, but best option.   Also purchased Amerex B500, 5lb Dry Chemical Class A B C fire extinguisher for hangar for $53.  Checked performance of GD-40 CO Detector: OK, shows warning on G3X display w/ audible.  Confirmed Flaps move down with switch acutation "down".   Starting Config of G3X, but most requires Wings and Tail assembled...so will need to wait until later in hangar.   I now have keys to hangar at Mt Hawley (3MY).   Will need to hang some lights...
cotter pins added 4 places on tailpipe hangars.  Followed
orientation  per Vans instructions - which made bottom 2
much harder to install cotter pin.  

New 2x4 wheel chocks for hangar.
 (too tall once Wheel Pants installed)

Just 1 light in hangar...so I'll be adding more!

Monday, April 22, 2019

Finish Kit

Data Plate, Vinyl N number, Experimental label ( 2 hrs )

Applied EXPERIMENTAL vinyl lettering to rear bulkhead panel (ie rear of baggage compartment).  Purchased last year the EAA Homebuilder's Step by Step Certification Guide, and this vinyl label is included.  It's really valuable with great instructions, and all forms needed with examples shown -- highly recommend to all builders.  Attached new Data Plate to LH side Aft Fuselage under leading edge Horiz Stab using 2 flush blind rivets.    Applied 3" vinyl N number to Aft Fuselage (both data plate and N number letters bought via Net Engravers).  Easy to apply, and although temporary (until I have airplane painted), I think they look great.
required EXPERIMENTAL label done
Data Plate ...done.


showing location of Data Plate. 
Similar to most Certified airplanes
easy process to transfer vinyl letters to Fuselage


these 3" letters meet Experimental regs...will do until I have plane painted

impressed by quality and strength of adhesion.  

Saturday, April 20, 2019

Firewall Forward Kit

Exhaust Installation ( 2 hrs )

Continued Exhaust install per 48-02.  Added Hangar Links.  Adjusted angle of Hangar Angles to 123.5 deg using provided template.   Step 4 required disconnection of Nose Gear Link (ref Sect 40A-06). to install Tailpipe.  Fortunately, another builder documented this - Vans doesn't describe.  I tried w/o doing 1st, but seemed impossible otherwise.  Used engine hoist to release load on nose wheel.  Tailpipe installed and gear re-assembled.  Ready to add remaining exhaust tubes, but trying to do as much as practical prior to opening engine to air/moisture - since 1st start is likely few weeks away.
removed bolt holding nose gear link...with engine hoist
lifting load entirely off nose wheel

tah dah ! 
Tailpipe installed on hangars in central tunnel

re-attached support link to Nose Gear. 
Ready to add exhaust tubes forward

Thursday, April 18, 2019

Firewall Forward Kit

Exhaust ( 3 hrs )

Received engraved Data Plate, Fuel Caps, and N number decal from Net Engravers.  Very pleased with results.  Re-installed 4" SCAT (air duct) to oil cooler.    Installed RH Vent cover per Sect 48-04, Step 1.  Completed Steps 1-4 at Sect 48-03, various hangars, tubes, & brackets.  Belt sanded raised edges at relief notches ( per Step 2, 48-04) on eight Heat Muff Ends.
Data Plate engraved,  Fuel Caps engraved, and N number
decal.  Small decals "free" for trial application, etc

Looks great !

Re-installed 4" SCAT after adding
TCW butterfly valve

various pieces prepped for installing Exhaust.

Wednesday, April 17, 2019

Finish Kit

Replaced Left LH master cylinder ( 2 hrs )

Replaced LH master cylinder on Left side with one Vans shipped free.  [ After initial installation, when I pumped this brake, bubbles in the line would immediately appear and the brake would get soft...all others were OK.   No leaks anywhere...so appeared to be ingesting air.]  Drained per gravity the brake fluid, then disconnected the cylinder.  Please no drips.   Transferred original elbow fittings, and installed new cylinder.  After refilling -- No leaks, No bubbles, and stays firm.  Hooray!   It was a defective cylinder (probably at shaft seal) sucking in air on back strokes.  Rare, but another builder had reported same issue in VAF forums a few years ago. 
Left master cyl is slightly darker finish vs
original and mate on right side

Tuesday, April 16, 2019

Avionics

Power to Instrument Panel ( 2 hrs )

I had a 2 week delay powering up my panel when I discovered a critical wire running power from Master Relay (Battery Contactor Relay) to Main Bus was missing.  I'd connected everything per Vans instructions, and connected everything from Stein Air for my panel & related.  My mistake was not looking at overall electrical schematic.  Stein Air picked worst timing for me to move to new offices, then another week at Sun n Fun.   Eventually I connected (pun intended!) with Josh at Stein Air, and we quickly diagnosed I needed a 4.5 ft 8AWG wire from Master Relay on firewall to the Aviation Bus Bar (which connects to Main Bus at CB panel).  Josh provided the wire with appropriate ring terminals.   I told him they should provide notes on schematic identifying what Stein Air was not intending to provide.  My mistake was assuming I had "everything" needed to complete the installation.  Now it seems obvious!   I ordered from Aircraft Spruce a 2 pc Firewall Shield (#61-275 ) and Silicone Grommet size 5/16 (#11-13460 ).  I didn't want to re-do the firewall penetration, & here,  but instead add specific hole for this 8 ga wire.    So NOW I have full power with 1st time I've powered up G3X, G5, GTR 200 Radio, and GMC307 autopilot.   Lots of tuning to do, and missing connections to most lights (wings, tail, canopy), ADHRS, etc.
Powered up panel !
New firewall penetration.  Silicone gromment under shields.
  Wrapped wire with silicone tape to make tight fit in grommet,
covered in hi-temp RTV.

view showing original firewall penetration just above.
 Master Relay on lower left, with Starter Relay below it