I've started my adventure to build a Van's Aircraft RV14a. For several years, I've been planning to build an Experimental (homebuilt) airplane - once retired.
But first, I needed to get my Pilot's License. (Kinda key !) So... first things first: I retired March 2014 from Caterpillar - and started flying lessons in the Summer of 2014. Soloed a day after Christmas, and got my Private July 2015. Shop set up, tools acquisition, and practise kits during Fall launched me into my build starting Dec 31, 2015 !

I've chosen to build the RV14a since it's about 10% larger than Van's prior models - so it fits my 6'4" frame well. Van's is well known for great value & outstanding flying qualities. It's been a no brainer decision for me. A tour of their facilities and demo flight in Oct 2013 clinched the deal. My wife - also a pilot - exclaimed after her demo flight "retire NOW so you can build one of these". The RV14a fits my mission of a good compromise between cross country & aerobatics. Plus...I fit, too.

So far, one month into building, it's been rewarding. Very challenging, but certainly a learning experience. The builder community is terrific - as is Van's tech support. I'm finished with the Vert Stab and Rudder (Jan 2016). So... with a 5 month delivery lead time, I've ordered the Quick Build Wings and Fuselage.

I hope this blog assists other new builders, just like several others have been valuable to me. Plus it will serve to document my build step by step. Please drop me a line via the "contact me" form on lower RH margin.
Update: April 2020 relocated to Wickenburg, Az to escape Illinois winters.

Friday, December 28, 2018

Avionics

BNC connector, Wiring in central tunnel  ( 3 hrs )

Crimped BNC connector to WAAS GPS antenna coax.  Connected to Garmin 20A unit on sub-panel. Completes all 3 BNC and 1 TNC connectors (4 out of 4 successful, so didn't need extra BNC ordered...yay!)  Completed bundling & securing wiring from central tunnel up to IP.   Maybe done with cramming under dash...assuming all connections check A-OK,  and no air leaks or brake line leaks.
Completed securing RH wiring and brake lines
LH wire routing and protection


RH side wire routing and protection
low angle view under "dash"

Thursday, December 27, 2018

Avionics

Discrete #3 (now Discrete #2) connected to Fuel Pump, etc  ( 3 hrs )

Update 5/29/19: needed to switch Fuel Pump On to Discrete #2, so Discrete #3 could be aligned with Canopy Warning.  #3 is locked in by Vans program for Canopy Warning uploaded into G3X.  So I switched Purple/Grn wire and Purple/Blu wire in connector J244 at GEA24.  This aligns Purple/Grn to Pin 41 and Discrete #2.   And Pin 42 = Discrete #3 for Purple/Blu wire.

Crimped connection Discrete #3 (now Discrete #2) wire to Fuel Pump Power wire adjacent to pump in center tunnel.  Will provide notice on display "Fuel Pump ON".  Bundled & protected LH Common Harness + GPS cable + Static/AOA/Pitot air lines + Discrete #3 #2 inside center tunnel and up to back of IP.  Installed nutplates so I could use -12 size cushion clamp ( seems nutplates should have been done via Quickbuild, since not otherwise denoted to do earlier)
yellow denotes adel clamp (nutplate had to be installed via blind rivets at this
stage).  Red wire is Fuel Pump power, which under top cables is joined to
Discrete #3 #2 wire (purple/green stripes)

progress bundling LH Common Harness, other wires & air lines
from center tunnel up to IP.  Repeat next for RH side.

Saturday, December 22, 2018

Avionics

GPS antenna coax ( 2 hrs )

Routed RG400 coax from GPS antenna along center Aft Fuse to 1st bulkhead, down to bottom then forward.    Shared same route as Static air line on LH side, so replaced orig cable ties as I added coax.  Due to awkward reach and position required, got lots of isometric exercise.  Good news - don't expect to be working inside Aft Fuse any more.  Again, my wife Nancy was key to helping me into and out of position in baggage area ( I'm too tall - and don't bend so easy these days)
joined with LH Static line along bulkhead
joined w/ other wires along center

Friday, December 21, 2018

Avionics

RG400 Coax antenna cables ( 3 hrs )

Routed RG400 coax from RH side Fuse at Comm whip antenna through to center tunnel.  Very difficult to pass cable through SB at transition to center tunnel...but eventually worked.  Crimped BNC connector on each end.  (Good videos from Stein Air and HomebuiltHelp , and EAA show how to do this successfully .   Then routed RG400 Coax cable from aft of baggage area through center tunnel up to IP for GPS WAAS antenna.  Crimped on TNC (threaded style  - and expensive at $23 vs $3.25 for BNC)  at antenna end.   Why Garmin uses this expensive connector at this antenna stumps me.   Also re-routed Static, Pitot and AOA air lines at IP.   As I routed coax cable nearby, I discovered perfect spot for a SB750-10 (not referenced in Vans instructions).  So I revised to route coax and these 3 lines together as shown below vs original pass over the vertical support.
coax cable prepped, then center pin crimped on
BNC connector crimped next,
added shrink wrap too


for Comm Antenna on RH bottom of Fuse
TNC (thread on stype) crimped for GPS antenna


routing/securing with static line next step
added snap bushing to vertical support, & re-routed air lines

Thursday, December 20, 2018

Aft Fuselage

SB 18-09-17  ( 2 hrs )

My wife Nancy did great job w/ rivet gun under fuselage while I bucked from inside.  I laid down a layer of empty 2 Liter soda bottles, then bags stuffed full of plastic bags (both rescued from recycling).  And a couple pillows helped avoid crushing the elevator bellcrank / pushrod. Once in position it wasn't too bad...but due to my height, getting into and out of position from baggage area was challenging.   After we completed bottom rivets, I match drilled & deburred the four  #30 holes.  Used rivet gun & bucking bar to complete attachment to bulkhead.  Whew, glad that's done !
After riveting, showing notes for rivet lengths.
Layers of 2 L soda bottles & bags of plastic bags
 made "nest" to lay on while reaching way aft

Looks good!  It seems to stiffen skin significantly, bridging
before and after bulkhead as well as directly to bulkhead.


ta - dah !   glad this is done

Wednesday, December 19, 2018

Aft Fuselage

SB 18-09-17  ( 2 hrs )

Started Service Bulletin SB 18-09-17 "Cracking of F01478 Aft Fuselage - Forward Bottom Skins".  Examples of cracks discovered are here and here.    Deburred, dimpled, machine c'sunk and primed all pieces in "kit" I received Oct 10, 2018.  On bottom of Fuse, drilled out 10 rivets (all without extra drama...Yay!)  Cleco'd exterior plate in place.  Next step requires crawling inside Aft Fuselage ...aaarrggghhh!  I know it can be done...here's example.  My wife will use the rivet gun from beneath Fuselage.  I've remembered to brace the tail, so it won't suddenly become a tail dragger. 😜
page 1 of  good instructions w/ great dwgs
deburred, dimpled & machine c'sunk....primed next


6 rivets removed center area, plus 2 LH & 2 RH   J-stiffeners

yellow marks highlight missing rivets.
You can see shop head ends still on fuselage bottom

Diamond shaped "skin doubler" in place on bottom surface

Tuesday, December 18, 2018

Avionics

OAT wiring in Wing, GA 35 GPS antenna ( 3 hrs )

Fabricated 3 alum "brackets" to hold SB437-4's to guide/support OAT wire in LH Wing (from Wing root to 1st Access panel)  -- for when Wing assembled to Fuse.   Positioned Garmin GA 35 GPS WAAS Antenna on top Fuselage behind rear window.  Fabricated alum doubler referencing couple other RV14a builder logs about 1" larger than antenna.  Eric Rushing at Vans Prod Support confirmed their demo RV14's and RV10 did NOT use a doubler (but mounted close to stringer).   Reason I checked with Vans was Garmin installation recommends doubler w/  12 - 16 rivets.  Prior to mounting doubler removed primer on inside Fuse skin for best ground contact (Garmin instructions for G3X/GA 35 antenna).  Note: GA 35 antenna is Serial No. 144,789.  P/n 013-00235-00
single rivet w/ epoxy located/mounted Snap Bushing supports.
 When Wing mounted to Fuse, will route OAT  wire via these 3

Doubler prepped.   After pic, changed to use lock nuts
instead of these nutplates shown

Used doubler to match drill Fuse skin
deburred, ready to mount antenna


prior to actually tightening screws.

prior removal primer for doubler grounding

Used acetone to remove primer for better grounding
TNC connector (not BNC) ready for coax cable.

Saturday, December 15, 2018

Avionics

Static, Pitot & AOA connected, Comm Antenna installed ( 4 hrs )

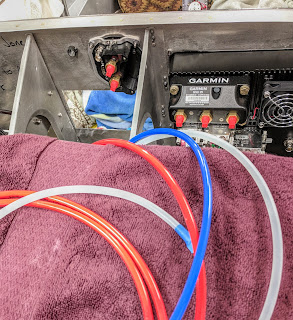
Connected Static (red), Pitot (white), & AOA (blue) lines to G3X at GSU 25 and to G5.   (note: blue AOA line goes only to GSU 25).  T fittings worked well.  Next, enlarged holes at Comm antenna mount on bottom RH side of Fuse and F-00020 Doubler per Sect 55-05, Fig 1 and Sec 28-02.  Mounted with 8-32 flathead SS screws.  Comm antenna is Comant C1 122 whip, VHF Com 118-137 MHz, Serial # 556913.   Also completed riveting second Joystick Boot w/ just delivered 8 more AACQ 4-3 rivets.  Good progress today, plus this morning I attended EAA Chapter 129 breakfast where my friend Rick Olson displayed his just built RV-4.   He's really enjoying every minute flying, w/ approx 6 hrs of 40 hr Phase 1 completed.  Very impressive !  Congrats Rick !
Static (red), Pitot (white), and AOA (blue) connected. 
Installed back-up battery on G5 also

Comm antenna mounted
Doubler plate on inside


Rick Olson with his RV-4.  He painted it too.  Terrific!


Friday, December 14, 2018

Avionics

GAP 26 wiring ( 1 hr )

Tightened and torqued gnd bolt.  Bundled wires along with alum tubing.  Sent email with pics to G3Xexpert@garmin.com asking if OK to attach wires & cable ties to alum tubes due to heat conducted from Pitot.   Probably need to re-do with wires & cable ties not touching alum tubes. [Update Dec 17: Garmin's Mike Huff, field service engr (contact G3xpert@garmin.com ) says no problem with wiring and cable ties attached to alum tubing.]  Also replaced orig USB charging port on IP (2.6 amp) with upgraded/new one provided by Stein Air w/ 4.8 amp capacity.   This will maintain iPad when Foreflight/GPS running, yet is below 5 amp CB.  Stein Air provided free - since all recent panels are equipped w/ the higher version.
 
view looking outboard

view looking forward.  

Thursday, December 13, 2018

Avionics

Gap 26 heated Pitot  installed ( 3 hrs )

Trimmed 3/16" OD alum tubes to 8 1/4" on GAP 26 heated Pitot (Garmin instructions note min 8" to avoid excessive heat conducted into plastic fittings/tubing).  Removed Pitot mast from bottom LH Wing.   Lined up holes in Pitot to drill clearance holes for 6-32 SS flathead screws.  Then countersunk, and shortened screws to 5/16".   Re-installed mast, then slid Pitot into place.  Connected AOA (blue) and Pitot (white) air lines using the newly released fittings purchased from Stein ( sku P-518 feature 3/16" one end, 1/4" other end).  Sweet!   Connected 14ga pwr wire, added gnd wire (also 14ga) to pairs of wires per Garmin instructions.  Wiring not yet bundled or protected, nor is gnd bolt tightened.  Overall, a lot of work, but pleased with results including the flush screws mounting Pitot.
trimmed to just 8.25".   Test fit push on fitting.

Removed mast from Wing.  At first I forgot the extra plate
is there to accommodate dimples in wing skin
when mounted from inside.
Ready to insert
Countersunk holes for mounting screws.


top view, inside.  NOTE: wires and tubing not
 yet bundled or protected.  Gnd bolt is loose.
View from adjacent bay with aileron bellcrank.  NOTE: wires
and tubing not  yet bundled or protected.  Gnd bolt is loose.


not a great pic...but with screws installed


Wednesday, December 12, 2018

Avionics

Pitot Heater wire install & ADS-B Antenna ( 3 hrs )

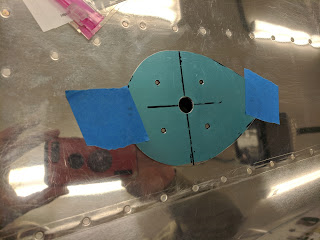
Crimped open barrel male pin (ref Sect 5-21 for instructions) to red 14ga wire for GAP 26 Pitot heater power.  After inserting into Pin #4 location in Connector P400 at Wing root (ref Sect 19-02 Fig 1 and Detail A ), routed outboard to Pitot mast.  Stayed far away from GMU 22 magnetometer as well as aileron pushrod.  Next, installed the monopole antenna ADS-B/Transponder  at bottom rear of tail.  I recently considered changing to a blade antenna, but the extra $130 cost ( 6x !) seemed excessive for the reduced drag.  Most builders install the monopole, but Vans provided the extra holes in this area for a blade antenna.   So I decided to use the monopole and simply "plug" those unused holes (Vans prod support confirmed).   I used small alum pieces placed with lots of J-B Weld to fill the holes. This can be sanded flush on exterior.   I also placed ~ 2" piece on extra blade antenna holes in mid-fuselage with same epoxy.
one of these red wires is the 14ga power wire
added to C400P
routed toward upper air line to "stay away"
from magnetometer


ADS-B monopole antenna installed. 
Plugged extra holes with epoxy and alum pieces
ADS-B/transponder antenna. 
2 holes filed w/ epoxy fore/aft, too

alum piece epoxied on second, unused Blade antenna holes.
Blue tape will be removed once cured

bottom fuselage...epoxy filling holes flush

Tuesday, December 11, 2018

Avionics

Pitot and AOA lines ( 2 hrs )


  • Routed blue 1/4" OD nylon air line for AOA through fuselage from wing root to IP. 
  • Routed "white" line for Pitot.   
  • and Red line in Fuselage is for Static air (routed recently)
Also replaced white line in LH Wing with blue line ( so now matched).  Cleaveland Tools had 25' of 1/4" OD blue line for only $6.35, so I had plenty for both Wing and Fuselage.  I purchased simple air coupler from Stein Air for joining air lines at wing root/fuselage...so I could route air lines in Wing completely, and in Fuselage completely now (vs when joining Wing to Fuselage).  Also, I routed 14ga Red wire from LH Wing root out to Pitot mast, along blue air line.  This will connect heater function on Pitot (non-regulated).
Static (red),  AOA (blue), and Pitot (white) lines to IP

Past spar, out to LH Wing root/fuselage
 

Red 14ga wire for heater function on Garmin GAP 26 Pitot. 
White line is for Pitot, Blue is for AOA

about 1/2 way to Pitot in LH Wing. 
Aileron pushrod not installed to bellcrank visible in bay