Dimpling LH Wing Skin ( 1 hr )
Sort session - started to dimple LH Bottom Skin doing first the #19 holes at Access openings and Pitot Mast Mount. Switched to #40 holes. Got distracted to go ahead and rivet on 16 nutplates at both Access openings.
Saturday, January 21, 2017
Friday, January 20, 2017
Wings
Located the Pitot Tube Mounting Bracket in LH Wing. I determined best location was 1 bay outboard of Access Bay just past Bellcrank bay. This was clear of tie down location, and would be much easier for final assembly and maintenance later, since beyond Pushrod. Fabricated a 4"x3" gusset from spare .032" aluminum sheet. Supports rear of Mounting Bracket against Rib. Satisfying to create from scratch. Ready to proceed to install Bottom Skins.


 |
| Transfer cutout to skin, along with 4 holes for attachment screws |
 |
| trial routing of Pitot and AOA air lines. |
 |
| Attached gusset w/ 2 blind rivets ( after priming) |
Thursday, January 19, 2017
Wings
Tech Counselor visit (3 hrs )
Received thumbs up - well done - from Sam Sisk, EAA Tech Counselor after examining Wings today. Ready to close up Wings with addition of Bottom Skins. Dimpled J-stiffener, Rib flanges. Countersunk rear spar flange, too. Two holes adjacent to Flap hinge bracket were simply done by taping in the countersink cutter into hex driver, since aluminum cuts easily. A few turns by hand and presto...done.


Received thumbs up - well done - from Sam Sisk, EAA Tech Counselor after examining Wings today. Ready to close up Wings with addition of Bottom Skins. Dimpled J-stiffener, Rib flanges. Countersunk rear spar flange, too. Two holes adjacent to Flap hinge bracket were simply done by taping in the countersink cutter into hex driver, since aluminum cuts easily. A few turns by hand and presto...done.

 |
| simple rig to reach tight clearance for countersink. |

Today the Gretz Pitot Tube Mounting Bracket & hardware arrived from Aircraft Spruce & Specialty Co. This design fits RV's with a jog at interface to spar flange. Discovered many RV builders have used this one via Vans Airforce Forums. I'll fabricate a simple brace/gusset at rear for support. (Van's hasn't completed their version for the RV14a listed as an option in their Avionics letter. Probably next year... )
Wednesday, January 18, 2017
Wings
LH Bottom Wing Skin ( 3 hrs )
Drilled and deburred holes in LH Bottom outboard Wing Skin and J-stiffener. Ready to dimple. With skin off, confirmed no new holes in rib flanges ! (proof I'd aligned ribs correctly with existing holes) Worked evening session so I could take skin off. Ready for Sam Sisk, EAA Tech Council to exam work on QB Wings Thurs morning ( his 3rd visit since build started on Empennage in Jan 2016.

Pic with phone inside Wing...confirming J-Stiffener holes were correctly positioned.
Drilled and deburred holes in LH Bottom outboard Wing Skin and J-stiffener. Ready to dimple. With skin off, confirmed no new holes in rib flanges ! (proof I'd aligned ribs correctly with existing holes) Worked evening session so I could take skin off. Ready for Sam Sisk, EAA Tech Council to exam work on QB Wings Thurs morning ( his 3rd visit since build started on Empennage in Jan 2016.
 |
 |
 |
| Overlap inboard & outboard J stiffeners |

Pic with phone inside Wing...confirming J-Stiffener holes were correctly positioned.
Tuesday, January 17, 2017
Wings
Bottom Wing Skins ( 3 hrs )
Unwrapped the Outboard Bottom Wing Skins. Deburred edges on LH skin, and stored RH for now. Added J-stiffener per Sect 20-03 and -04. Good progress - mounted w/ clecos to Wing. Ready to match drill next.

Unwrapped the Outboard Bottom Wing Skins. Deburred edges on LH skin, and stored RH for now. Added J-stiffener per Sect 20-03 and -04. Good progress - mounted w/ clecos to Wing. Ready to match drill next.

 |
| checking as I go to be sure Ribs aligned correctly |
Aaaarrrgh ! After re-check, I'll need to remove LH Tank from Wing to search for a small leak. Can't find any in accessible areas, but balloon slowly leaks down in few hours. RH Wing checked A-OK few days ago.
Monday, January 16, 2017
Wings
Elect Aileron Trim ( 2 hrs )
Leak test LH tank again. Balloon stays inflated for more than 2 hrs, and I can't find a leak on surfaces I can access with soap bubbles. Need to flip Wing over to check other side - esp fuel fill cap area (think I did thoroughly first time, but want to repeat). All this to determine if need to remove tank from spar to access areas I can't reach when installed...such as back wall and outboard rib.
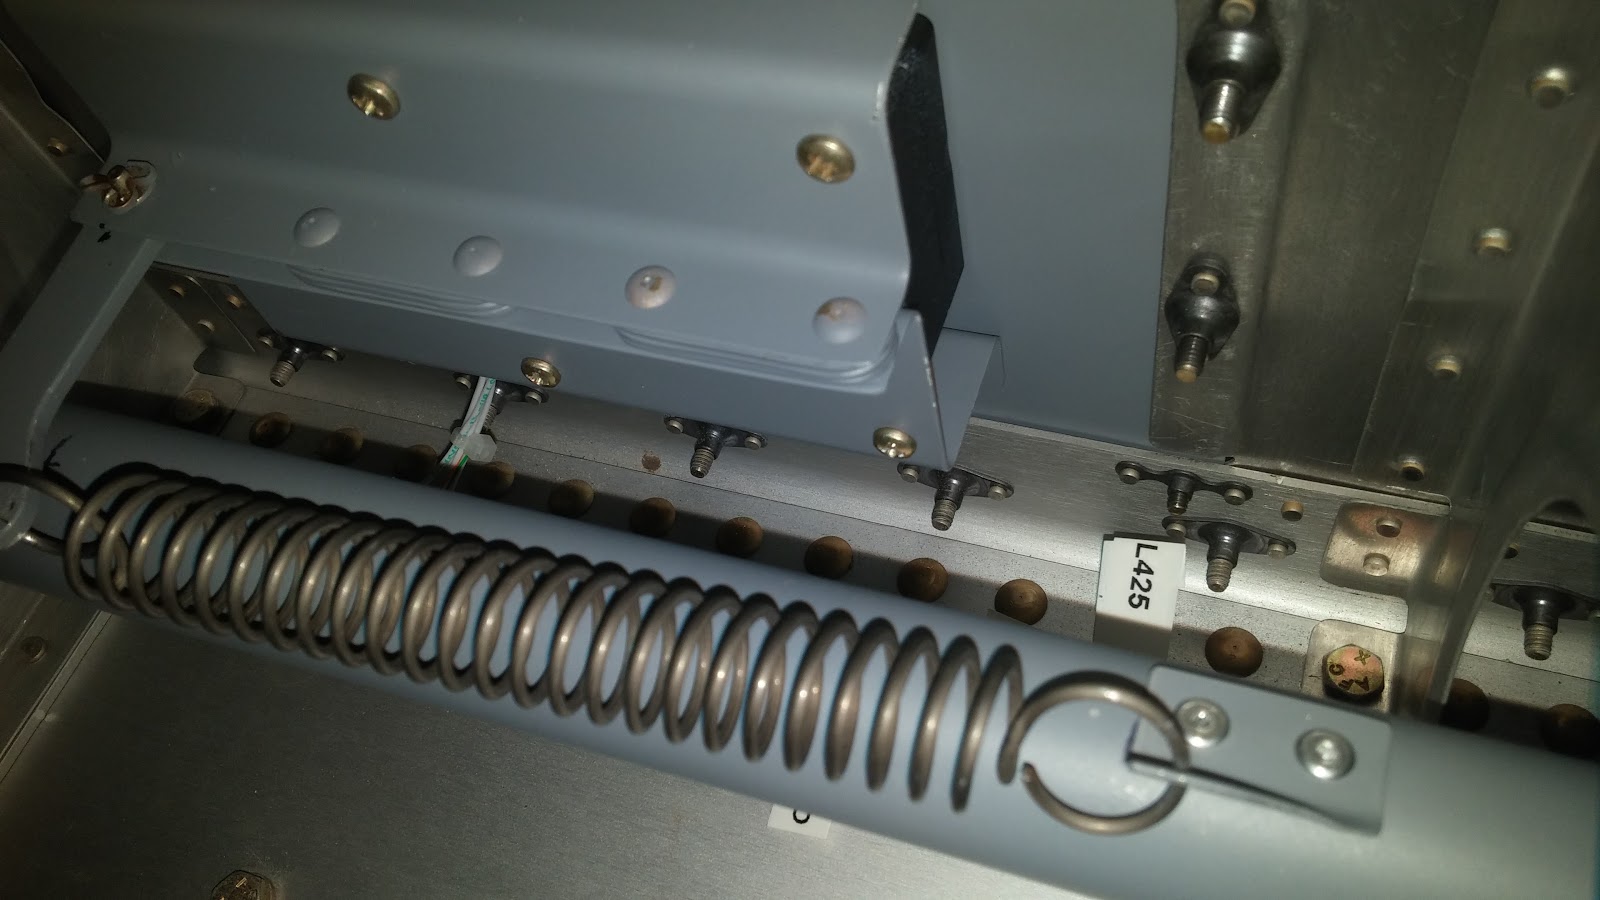
Installed Elect Aileron Trim assembly into Wing. Mounted 2 Spring Brackets onto Pushrod with blind rivets. I measured several times to insure correct position. When installing it's very challenging to stretch Springs far enough to attach to Trim Arm. Once assembled into Wing, confirmed clearances through full Aileron travel.


Once Wing was moved to horizontal on table (vs vertical in wing cradle) the Aileron moved to neutral position balanced by springs. Sweet !
Leak test LH tank again. Balloon stays inflated for more than 2 hrs, and I can't find a leak on surfaces I can access with soap bubbles. Need to flip Wing over to check other side - esp fuel fill cap area (think I did thoroughly first time, but want to repeat). All this to determine if need to remove tank from spar to access areas I can't reach when installed...such as back wall and outboard rib.
Installed Elect Aileron Trim assembly into Wing. Mounted 2 Spring Brackets onto Pushrod with blind rivets. I measured several times to insure correct position. When installing it's very challenging to stretch Springs far enough to attach to Trim Arm. Once assembled into Wing, confirmed clearances through full Aileron travel.

 |
| Endoscope view showing connector and wire routing |
 |
| Endoscope view: Trim arm clearance above Pushrod |
Saturday, January 14, 2017
Wings
Elect Aileron Trim (4 hrs )
Installed LH Flap to confirm fit & operation, then returned to safety of "storage" room. Aligns with Aileron well.


RH tank leak test completed -- no bubbles found and balloon stays inflated at least 24 hrs. Yay ! Rec'd from Vans the 4 AN3-13A bolts (error to not include in QB kit), so I replaced the temporary -12A bolts.
Completed Electric Aileron Trim build, Sect OP 38-04, 05 and 06. Drilled, deburred, dimpled, primed and attached nutplates. Took several pics inside wing to confirm clearances and setup. Some with endoscope (lower resolution).


Crimped Molex Micro-fit Pins onto 5 wires, then inserted into Molex connector. Really challenging since tiny pins. Test fit into mating connector inside access bay. A little stiff first, then seemed easy to re-insert. Discovered one of the female pins was driven out of connector. Needs to be replaced...next work session. Fortunately I'd ordered spare pins. [ done 1/16 ]


Subscribe to:
Posts (Atom)