I've started my adventure to build a Van's Aircraft RV14a. For several years, I've been planning to build an Experimental (homebuilt) airplane - once retired.
But first, I needed to get my Pilot's License. (Kinda key !) So... first things first: I retired March 2014 from Caterpillar - and started flying lessons in the Summer of 2014. Soloed a day after Christmas, and got my Private July 2015. Shop set up, tools acquisition, and practise kits during Fall launched me into my build starting Dec 31, 2015 !

I've chosen to build the RV14a since it's about 10% larger than Van's prior models - so it fits my 6'4" frame well. Van's is well known for great value & outstanding flying qualities. It's been a no brainer decision for me. A tour of their facilities and demo flight in Oct 2013 clinched the deal. My wife - also a pilot - exclaimed after her demo flight "retire NOW so you can build one of these". The RV14a fits my mission of a good compromise between cross country & aerobatics. Plus...I fit, too.

So far, one month into building, it's been rewarding. Very challenging, but certainly a learning experience. The builder community is terrific - as is Van's tech support. I'm finished with the Vert Stab and Rudder (Jan 2016). So... with a 5 month delivery lead time, I've ordered the Quick Build Wings and Fuselage.

I hope this blog assists other new builders, just like several others have been valuable to me. Plus it will serve to document my build step by step. Please drop me a line via the "contact me" form on lower RH margin.
Update: April 2020 relocated to Wickenburg, Az to escape Illinois winters.

Thursday, May 9, 2019

Shop Set Up


LED lights added in Hangar

My wife helped today install four 4' LED Shop lights in newly rented hangar.  ( Search Amazon "4 Pack LED Shop Light for Garage: 36W, 4Ft, BBounder 3600 Lumens"  Only $60 for all four.)  The airport staff brought a big ladder that worked perfectly. With Nancy's help, the project got done quickly.


Wednesday, May 8, 2019

Engine

Exhaust install continued ( 2 hrs )

Installed Forward Exhaust Hangar assembly per Sect 48-03, Steps 1-6.   Also started working on heater install, with 2" SCAT hoses, etc.

Hangar from Left rear corner
engine sump to clamp around left
exhaust prior to joining tailpipe.
2" SCAT hose clamped to Right Vent on firewall.

Tuesday, May 7, 2019

Engine

Exhaust installation ( 4 hrs )

Installed Halon fire extinguisher (A344T, 1.25lb 1211 Class B C)  in baggage area  - where pilot can easily reach on wall behind passenger.   Installed LH and RH "Stick to Torque Tube Pushrods" per Sect 41-07, Step 1.  Installed Exhaust per Sect 48-02, Step 4 & 6,7.  Used Permatex #77124, Nickel Anti-Seize Lubricant on slip joints.  Attached Engine Dryer to insure engine interior remains low humidity since opened to install exhaust.  With both 'spark plug' desiccants and circulating dry air, believe I have protection against corrosion.
Halon fire extinguisher in baggage area.
Amerex A344T, 1.25lb 1211 Class B C
LH forward Exhaust added (taped over holes for EGT sensor).  Cover still on rear exhaust port.


From under LH side with rear exhaust added. 
Note: Heat shields in several locations not yet added.
From under tailpipe


Exhaust joining Y for Tailpipe.

Monday, May 6, 2019

Engine

Pressure test fuel system ( 4 hrs )

5 lb can of white desiccant arrived, used approx 1/2 in engine dryer container.  Ready to use now.   Completed prep of 2" SCAT hoses for heater per Steps 1-5, Sect 48-05.   Checked left fuel system w/ Valve in Off position, from Wing Root to Servo for leaks.  Held 30 psi air pressure as well as no signs leakage with soap bubbles at connections.  Repeated for right side.  When I turned fuel valve to Left tank, I found gradual loss of pressure over 30 mins.  I soaped all joints...can't find any leak point with soap bubbles.   Going to repeat soon and inspect again...Need to cap off opposite side at Wing Root to insure no internal leaking from Left to Right side inside Fuel Valve.
Approx 1/2 of 5 lb can of white desiccant added to
container in Engine Dryer

Prepped 2" SCAT for heater system

Searching for air leak while pressurizing
fuel system. (pic taken after bubbles drying out)

More checking for air leak while testing fuel system to 30 psi. 

Thursday, May 2, 2019

Shop

Wing Jack Stands  ( 6 hrs )

Built 2 Wing Jack Stands, using Harbor Freight 3 Ton Rams (about $45 each on sale),  1/2" conduit,  SS hose clamps ( 2 for backup) and 2 ft x 2 ft plywood (from shipping crates).  Referenced examples from other builders on VAF.  Biggest job was flattening the conduit in vise on each end.  Ground couple SS 3/8-16 carriage bolts into spherical heads.  Drilled ends of Ram with 1/2" drill to match.  Using 1" to 1/2" reducers (piping at Menards, etc) as safeties to insure bolt head stays on top of ram !   Very solid, not too heavy to move around.
scrap plywood bases
 (note: either Lycoming or ABF sprayed message onto crate)

ground heads to fit 1/2" diameter drilled "hole"

1" to 1/2" reducer fits perfectly to insure bolt won't
slip off.  note two SS hose clamps

Wednesday, May 1, 2019

Engine

Engine Dehumidifier /Dryer  ( 7 hrs )

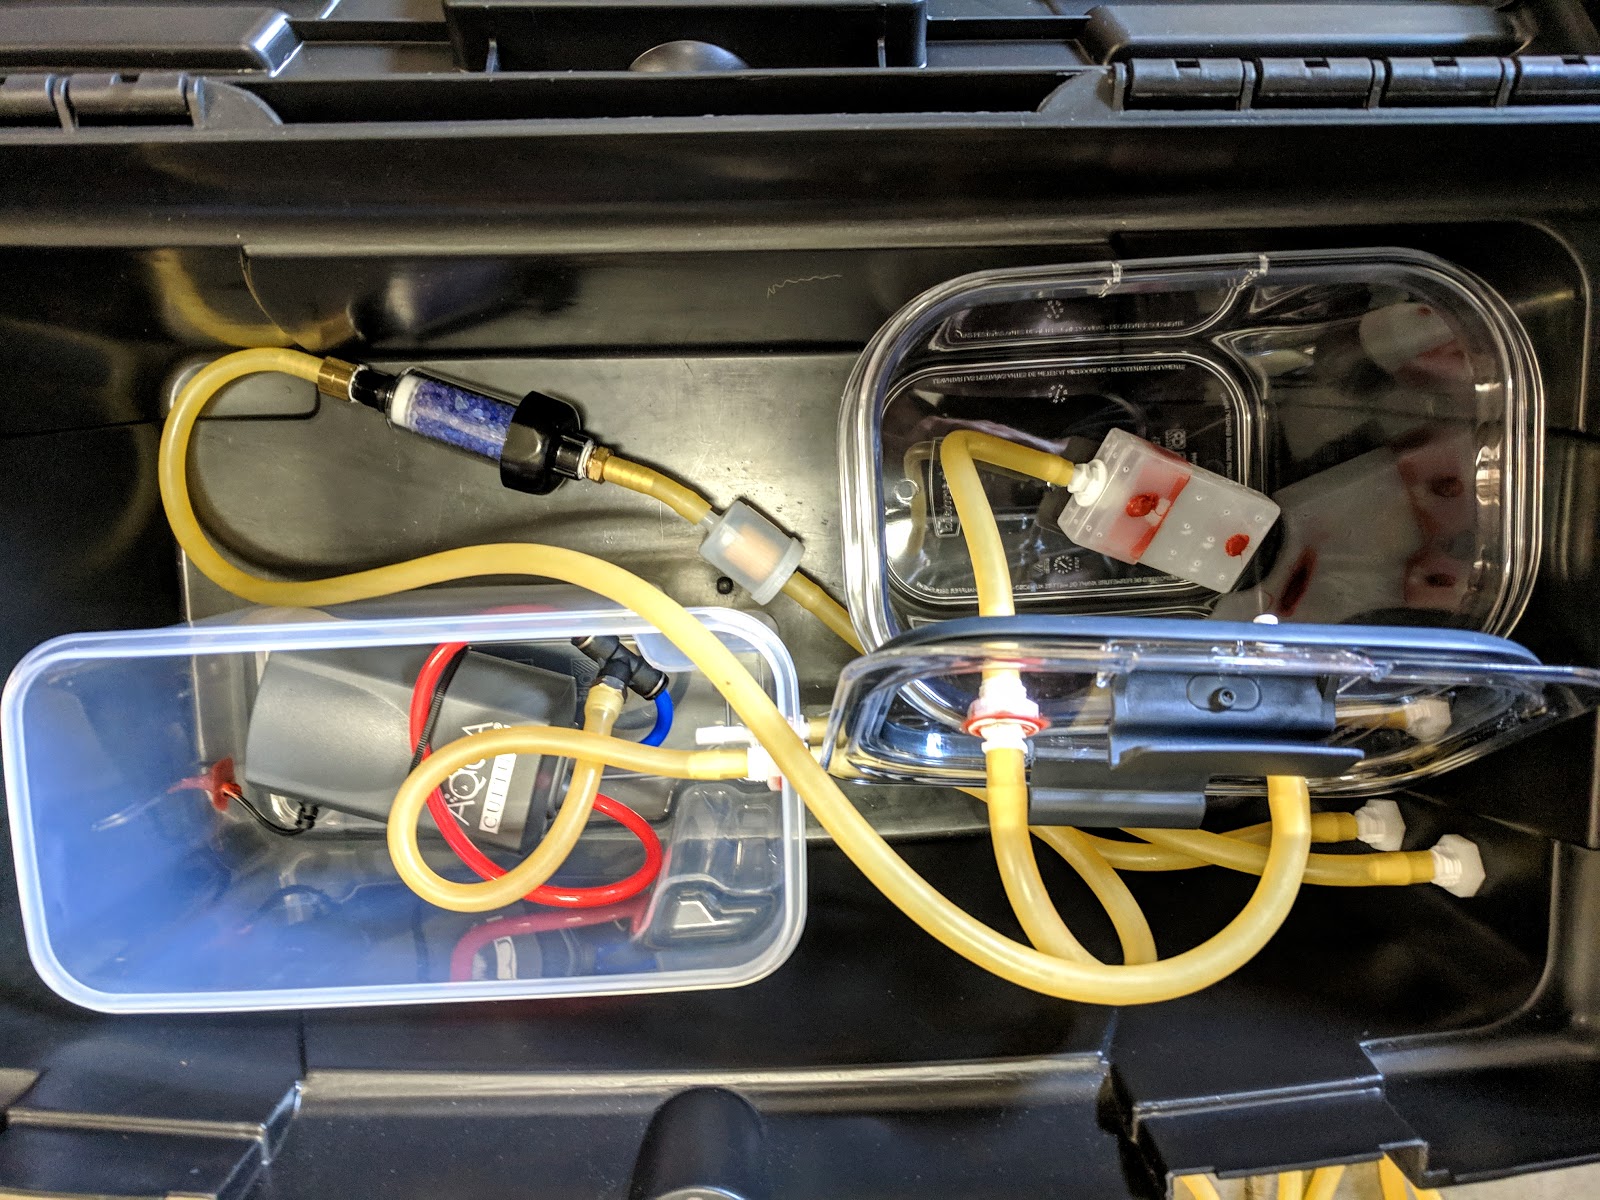
Built Engine Dryer using recommendations per Bill Lane (local builder of RV 7) and several example posts in VAF.  This will minimize risk of corrosion inside engine if not run weekly (moisture accumulates from combustion).  Will connect the dry air output at Dipstick, with return air captured via Breather.   Uses aquarium pump (must be in air tight container itself with only air from Breather connected), to move air through about 2 quarts of desiccant.  I'll use white desiccant (lower cost) followed by small container of blue desiccant (color changes when saturated).  Small engine fuel filter insures clean air returned to dipstick.  I've also been working on 2 Wing Jacks, using 3 Ton hyd rams from Harbor Freight (also per examples in VAF)...pics soon.
Tool box services as container.  Original plug Lycoming ships
 engine with used to insert dry air into engine. Return air from
 Breather.  (small red caps keep clean until using)

Aquarium air pump is in air tight container so only return air from
engine is cycled.  Desiccant container also must be air tight.  Blue
 desiccant in "inline desiccant" vessel to provide indicator when
primary "white" desiccant is saturated.  Small filter just
prior to exit to engine insure "clean" air.

Lots of latex tubing (vinyl will get stiff in colder weather).  Pump
 has 2 outlets, so combined via T fitting.   Created distribution
 box for air inside desiccant container using small
plastic box (or drill alum tube, etc)

Saturday, April 27, 2019

Finish Kit and Avionics

Misc, fire extinguisher & hangar ( 3 hrs )

Trying to complete as many tasks as feasible prior to moving to hangar.    Checked all 5 sets of  Kit instructions for any "loose ends".  A few final torques, replaced temporary nuts, etc...but nearly all I can do has been completed. Still lots of post-its on pages identifying actions once Wings and Tail are assembled onto Fuse.  Still pending Exhaust assembly as last step (to keep engine closed from moisture as long as practical).   Made 2 pairs of wheel chocks from scrap 2x4's.  Ordered Amerex A344T, 1.25lb Halon 1211 Class B C fire extinguisher (reviewed VAF for recommendations, pros/cons) for cockpit.   Expensive at $199, but best option.   Also purchased Amerex B500, 5lb Dry Chemical Class A B C fire extinguisher for hangar for $53.  Checked performance of GD-40 CO Detector: OK, shows warning on G3X display w/ audible.  Confirmed Flaps move down with switch acutation "down".   Starting Config of G3X, but most requires Wings and Tail assembled...so will need to wait until later in hangar.   I now have keys to hangar at Mt Hawley (3MY).   Will need to hang some lights...
cotter pins added 4 places on tailpipe hangars.  Followed
orientation  per Vans instructions - which made bottom 2
much harder to install cotter pin.  

New 2x4 wheel chocks for hangar.
 (too tall once Wheel Pants installed)

Just 1 light in hangar...so I'll be adding more!