I've started my adventure to build a Van's Aircraft RV14a. For several years, I've been planning to build an Experimental (homebuilt) airplane - once retired.
But first, I needed to get my Pilot's License. (Kinda key !) So... first things first: I retired March 2014 from Caterpillar - and started flying lessons in the Summer of 2014. Soloed a day after Christmas, and got my Private July 2015. Shop set up, tools acquisition, and practise kits during Fall launched me into my build starting Dec 31, 2015 !

I've chosen to build the RV14a since it's about 10% larger than Van's prior models - so it fits my 6'4" frame well. Van's is well known for great value & outstanding flying qualities. It's been a no brainer decision for me. A tour of their facilities and demo flight in Oct 2013 clinched the deal. My wife - also a pilot - exclaimed after her demo flight "retire NOW so you can build one of these". The RV14a fits my mission of a good compromise between cross country & aerobatics. Plus...I fit, too.

So far, one month into building, it's been rewarding. Very challenging, but certainly a learning experience. The builder community is terrific - as is Van's tech support. I'm finished with the Vert Stab and Rudder (Jan 2016). So... with a 5 month delivery lead time, I've ordered the Quick Build Wings and Fuselage.

I hope this blog assists other new builders, just like several others have been valuable to me. Plus it will serve to document my build step by step. Please drop me a line via the "contact me" form on lower RH margin.
Update: April 2020 relocated to Wickenburg, Az to escape Illinois winters.

Wednesday, January 31, 2018

Engine

Cotter Pins, etc ( 1 hr )

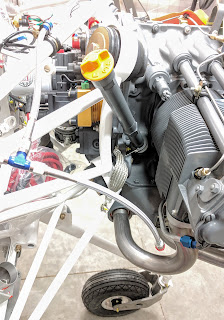
Added cotter pins to 4 castle nuts on engine mount bolts.  The one at bottom mount under LH rear cylinder is tough to reach (see pics).   Installed Oil Filler/Level Tube with safety wire.
getting this cotter pin on was challenging...deep recess

long needle nose, long screwdriver used to insert and bend ends

safety wire on Oil Dipstick tube. 
close to engine mount, but clears 3/8"

easy access to this cotter pin

Tuesday, January 30, 2018

Engine

Engine Mounted ( 4 hrs )

Completed Sect 43-05 & -06 for fluid fittings, sensors on rear of engine. (did need to go to local store to purchase 13/16 deep socket, and 1" socket)  Added the silicone hose to PMAG for the MAP connection.  Mounted to firewall - carefully following instructions at 43-08 to insure "soft" vs "hard" durometer Dynafocal mounts were correctly positioned on top vs bottom (reversed).  Contacted Vans tech support, and Eric Rushing confirmed the "EA Dyna VI - Std"  are the correct rubber mounts, even though Vans instructions call out different part numbers.  Using the Harbor Freight engine hoist worked out really well.  Eric mentioned typically builders need a couple helpers to wrangle the engine into the mount locations.  I started with top 2 mounts, aud used hoist to re-position engine until bottom mounts aligned.  I don't need the sawhorse holding up aft fuselage -- plenty of noseweight !   I've been told engine needs to compress rubber mounts up to 2 months before aligning cowling,...so let the compression begin!


glad able to add fluid fittings prior to mounting
since some would be challenging to do after

Monday, January 29, 2018

Engine

Lycoming IO-390 delivery ( 3 hrs )

Big Day !   Engine delivered via UPS.  Pleased "crate" was in great shape (clean, no marks or punctures).  Tip N Tell indicated always upright too.  Unpacking was easy, but took some maneuvering to enable lifting with my hoist.   Started adding fluid fittings, ground strap, etc per Vans instructions in Sect 43-05 and -06.  Especially on rear of engine, easier now than after mounted.
after unpacking, needed to switch ends of shop
Tilt N Tell on right area...A OK.


Engine number EL-691-80E

standard Magneto..

and one EMAG's  PMAG

Engine Logbook, misc loose parts


Sunday, January 28, 2018

Avionics

AutoPilot Pitch Servo Installed ( 3 hrs )

Deburred, primed & finish painted (Rust-oleum High Perf Enamel Stainless Steel) Battery Box Angle and Prop Gov Bracket Assembly.  With great help from Nancy (to twist and turn my 6'4" frame into baggage area), I installed the AP Pitch Servo per Sect 56-03 & -04.  Really pleased that chore is done!
ready for later

Pitch Servo is mounted.  Torque seal applied.  Decided I'll add
another nylon tie to loop of wires to insure further away
from rudder cable...although 1 inch clearance already.

smooth through full range of travel

ready to add Common Fuselage Harnesses
 (WH00125) from here forward

Friday, January 26, 2018

Avionics

MAP hose assembly ( 1 hr )

Installed MAP line purchased from Aircraft Speciality.  Includes 2 Tee's to route lines to single PMAG as well as between engine and MAP sensor.  This is a "test" fit for this supplier, as they already have a version for two PMAG equipped RV14a's...so this is their first version for a single PMAG.  I'm documenting fit, etc for them.
test fit of MAP hose package


still need line from "nipple" to back of PMAG
once engine installed...

Thursday, January 25, 2018

Avionics

Magnetometer installed ( 2 hrs )

Completed assembly of GMU22 Magnetometer, then installed into Left Wing.  Discovered need "CPC" connector to complete wiring hook ups.  Emailed both Eric Rushing at Vans, and Nick Millard at Stein Air.   Nick responded noting he'd forgot to include CPC connector along with GMU22 (he already had mailed Mount Ring last week).  Eric provided some guidance on diagrams with codes showing which wires connect to which pins.  (ref  WH00125 Fuselage Common Harness, under Left Wing details).  Nick also emailed simple diagram showing wire code for connections.    Added more hi-temp RTV to heat vents.
Assembled with Mount Ring

need matching CPC connector !
9 wires to connect to CPC round connector....
 

Step 6:  need CPC connector, but install kit bags are empty
completely sealed with hi-temp RTV

Wednesday, January 24, 2018

Avionics

ELT install & Sealed Heat Vents ( 2 hrs )

Completed installation of ELT and Audio Alert.   Rec'd GMU 22 Install Kit, so added Mount Ring to Bracket for Magnetometer.   Added hi-temp RTV silicone (red) to Heater Vents - esp. at corners with approx. 1/8" gaps.  (per Terry Moushon, via EAA tech inspector recommendation).  I'm planning to add sealant all around tube and along seams to firewall next.
still need grommet along bulkhead edge to protect wires
audio alert mounted bottom of Vert Stabilizer
(will be above ELT)


paintbrush holding flapper door clear of sealant.
 

Tuesday, January 23, 2018

Avionics

ELT installation  ( 3 hrs )

Started installation of ELT per Sect 53-02 ( ACK Tech  Model E-04 121.5/406 Mhz Emergency Locator Transmitter).  A lot of material to preview in ACK's Installation/Operator Manual.   Installed Antenna in baggage area per Steps 1-6, mounted tray in Aft Fuselage, drilled 4 holes in bottom of Vert Stabilizer to mount Audio Alert Indicator.  Soldered 4 wires to DIN connector per Steps 1-6 at Sect 53-04 which was kinda challenging due to small size (and triple checking to get order correct!).  Need special Duracell Lithium batteries for Audio Indicator (CR2  3V) and Cockpit Remote (PX28L  6 V) before I can mount ELT, etc.
Kit doesn't include all required hardware that Sect 53 shows

Antenna is bent to conform to Rear Window shape

Note tray for ELT in background. 
After soldering, prior to re-assemble DIN connector.
(encapsulate w/ silicone, too )

Monday, January 22, 2018

Firewall Forward

EAA Tech Counselor Review

Terry Moushon, a new EAA Tech Counselor spent several hours inspecting & discussing my build status and plans.   Terry built a Vans RV10 (4 seater), and first flew May 2016.  He's the builder I visited in 2013 & 2014 prior to my decision to proceed with building, and he's been very helpful.   He shared numerous insights into his recent experiences -both building and flying/maintaining.   He also recommended several enhancements or features I can do to improve durability and maintainability.   I received very positive, complimentary notes from his review ( this is #4, with Sam Sisk doing first three reviews during 2016)   Terry's a terrific builder and makes an excellent Tech Counselor.  Thanks Terry !

Saturday, January 20, 2018

Avionics

Auto Pilot Servo  ( 3 hrs )

Installed Garmin Auto Pilot Servo GSA 28 for roll in right Wing per Sect 56-05, Steps 1-12.  Tight & awkward  access took lots of time and many different tools, but got 'er done.  Tried to assemble Garmin Magnetometer GMU22 to Van's Mounting Kit, but Stein Air forgot to include the Mount Ring from the connector kit.  They mailed it today.

discovered Stein Air forgot to include Mount Ring
for Magnetometer (its now in the mail)

Friday, January 19, 2018

Firewall Forward Kit

Sensors installed on Firewall ( 1 hr )

Installed Garmin MAP Sensor (Step 5 at Sect 43-03) on Firewall,  and Oil Press and Fuel Press Sensors on Sender Mount (Step 5 at Sect 43-04).   I rec'd these as part of shipment from Stein Air of all components not mounted directly to Panel.
Manifold Air Pressure sensor

Oil Pressure sensor on left,  Fuel Pressure sensor on right

Thursday, January 18, 2018

Firewall Forward Kit

Relocating Throttle/Prop/Mixture Cable Controls (3 hrs )

Trial fit the T/P/M cable template (repositions these cables at bottom of Panel, instead of just below on bracket to provide greater knee room).  Stein Air's Nick Millard has done great job creating this template using 4 mounting screw locations as key reference point.  I used to mark "half-moon" portions of lower crossmember to remove.   Cables installed perfectly, only requiring removal of bracket mid-way back from Panel.   Cable will be anchored to other existing shelf, and use original clamps on LH and RH side, and snap bushing in center.   Designed a doubler to provide uniform contact surface for lockwashers/nuts (just above the crossmember).  Nancy and I both tried them out with successful flights !
prior to removing "half moons" from crossmember.

1 nutplate in center was removed.  Stein Air uses a single Panel,
instead of 3 pieces (center, LH & RH)...so plenty of strength
 even with cutouts.
without doubler above crossmember...


new position about 1.5 inches higher.  They are slightly closer
 (to fit between internal vertical walls).  The Alt Air knob
 is now above, vs below others.    No bracket below Panel

fits me (6 ' 4" tall).   Good hand clearance
fits Nancy  (5' 10" tall)


outline for doubler behind Panel