I've started my adventure to build a Van's Aircraft RV14a. For several years, I've been planning to build an Experimental (homebuilt) airplane - once retired.
But first, I needed to get my Pilot's License. (Kinda key !) So... first things first: I retired March 2014 from Caterpillar - and started flying lessons in the Summer of 2014. Soloed a day after Christmas, and got my Private July 2015. Shop set up, tools acquisition, and practise kits during Fall launched me into my build starting Dec 31, 2015 !

I've chosen to build the RV14a since it's about 10% larger than Van's prior models - so it fits my 6'4" frame well. Van's is well known for great value & outstanding flying qualities. It's been a no brainer decision for me. A tour of their facilities and demo flight in Oct 2013 clinched the deal. My wife - also a pilot - exclaimed after her demo flight "retire NOW so you can build one of these". The RV14a fits my mission of a good compromise between cross country & aerobatics. Plus...I fit, too.

So far, one month into building, it's been rewarding. Very challenging, but certainly a learning experience. The builder community is terrific - as is Van's tech support. I'm finished with the Vert Stab and Rudder (Jan 2016). So... with a 5 month delivery lead time, I've ordered the Quick Build Wings and Fuselage.

I hope this blog assists other new builders, just like several others have been valuable to me. Plus it will serve to document my build step by step. Please drop me a line via the "contact me" form on lower RH margin.
Update: April 2020 relocated to Wickenburg, Az to escape Illinois winters.

Thursday, August 30, 2018

Empennage

Empennage Fairing ( 1 hr )

Wet sanded most of Emp Fairing with 80 and 120 grit to remove waviness and high spots.   Good progress, but more needed.

Wednesday, August 29, 2018

Empennage

Empennage Fairings ( 4 hrs )

Per Sect 12-13, final trimmed Fairing edges to within 9mm of holes.  Covered Fuse, HS, and VS contact areas with cellophane packing tape (then applied auto wax for good measure).  Mixed epoxy/flox to smooth, slight sag mix then applied to underside Fairing in marked areas.   Tried not to smear all over VS as I positioned onto Fuse/HS/VS.   Inserted 27 screws followed by major clean up.  Several hours later, I began sanding to eliminate slight waviness and taper toward edge.   Lots of sanding to do next.  (I'm praying the Fairing comes off, but gonna wait until more rough sanding done)
trimmed edges, re-installed
clear tape, then car wax applied as extra release


Underside sanded where flox will be attaching
after clean up, starting to cure.  

later, after cure, began to sand.  Shows how
waviness is being eliminated.  Will have consistent
edge contacting alum, with no gaps.

Tuesday, August 28, 2018

Empennage

Empennage Fairing ( 4 hrs )

Riveted 7 nutplates to Aft Fuselage per Sect 12-12.  The 4 on lower sides were challenging to reach with my large hands twisting through openings.   Had to remove H.S., loose ELT...then success!   Remounted H.S., replaced temporary nuts on 4 bolts holding VS-01402 VS Bracket, and torqued.  (note in picture, hole for mounting VS is skewed left, giving VS right turning bias in flight offsetting engine torque, etc.)  Re-mounted VS, then added Gap Covers.  Discovered I'd forgotten to install nutplate at aft position.  I'd dimpled earlier, so added K1100-6 nuplates which was easy to do while VS on Fuse.  Re-installed Emp Fairing w/ 27 flat head screws.  SWEET !   Next:  make final trim, and fill few small gaps with epoxy/flox mix per Sect 12-13.
 torq seal (yellow) added once nuts torqued. 
Others are still temp, since will remove HS again
lower nutplates were challenge to reach,
even w/ HS removed


installed aft nutplate for Gap Cover
1st installation with flush screws

Monday, August 27, 2018

Empennage

Empennage Fairing ( 3 hrs )


Riveted 10 nutplates to Horiz Stab and 12 nutplates to Vert Stab after match drilling #40 rivet holes, then mach c'sinking (dimpled on Horiz Stab), per Step 7 at Sect 12-11, and Steps 1-4 2 12-12.  Still need 7 nutplates added to Aft Fuselage (but these were prepped during build of Aft Fuse last year).
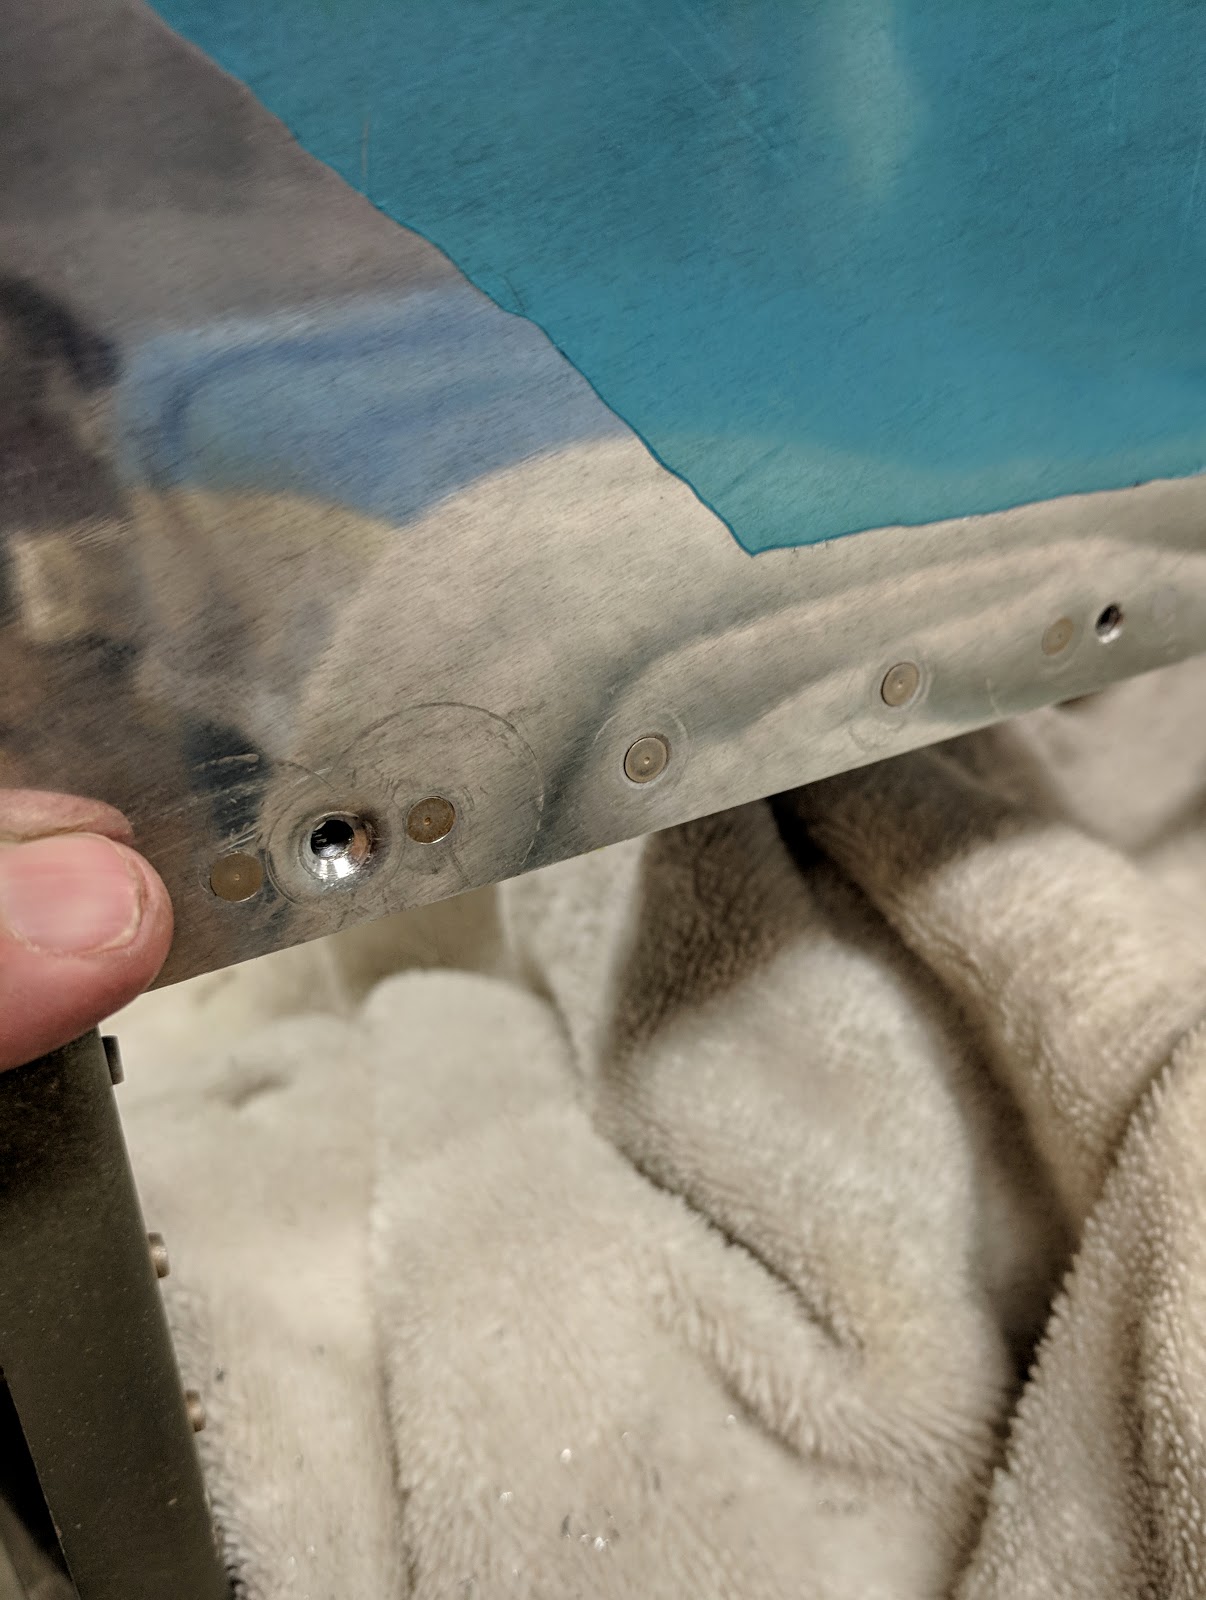
Vert Stab nutplates added.
 (applied grey Napa 7720 primer at scuffed areas)

in process of riveting nutplates to H.S.
Able to do w/ HS still mounted to Fuselage

Saturday, August 25, 2018

Empennage

Empennage Fairing ( 4 hrs )

Completed Steps 1-6 in Sect 12-11:  Transferred hole centerlines to Fairing, drilled #40, then enlarged with #27 drill.  Process worked very well for the opaque fiberglass Fairing.  Machine C'sunk all holes in Fairing for #6 screws.  Dimpled aft hole in Gap Covers (F14111 L & R ).  Removed Vert Stab so I could drill for nutplates while on bench.  Note:  received Registration for plane from FAA...it's officially N3714R  now ! (quicker than expected - only took couple weeks)
selfie showing centerline marks (where to drill)
RH side - done w/ #40, partially done enlarging
 to #27 with 1/8" cleocs


LH side...pending #27 final hole sizing
Vert Stab on bench, drilling for nutplate rivets

Friday, August 24, 2018

Empennage Kit

Empennage Fairing ( 4 hrs )

Trimmed Empennage Fairing to within 1/8" scribe line per Sect 12-10, Steps 1 & 2.   Retrieved from storage the Horiz Stab and Vertical Stab to mount to Fuselage.  Added Emp Gap Covers F12111 L & R.  Since Fairing is opaque due to primer/filler coating, I marked center-line of nutplate holes along Fuselage, HS, & VS - including mark at 50 mm distance.  Will use to transfer hole center-line to Fairing when drilling (vs light inside which would required sanding off coating at each location, OR using the spherical magnets).    Per Steps 3-5 at Sect 12-10,  I did many iterations of marking interference at leading edge of VS and HS, then grind/sand some...repeat.    I eventually achieved good, tight fit. 
trimmed excess...leaving 1/8" at scribe line
temporary mounting HS and VS


marked line from centerline nutplate holes, with cross mark
 at 50  mm.  Will allow accurately locating blind holes to drill 

first pass... interference at VS preventing Fairing from
contacting HS leading edge...but close

after several iterations of grinding/sanding inside
Fairing, getting good fit around all leading edges

good fit at VS leading edge

Thursday, August 23, 2018

Finish Kit

Riveted FF00003B to -3A per Step 18 at 46A-30 (done with Sect 46A).  Mounted to Bottom Cowl - great fit.  Used closed cell foam from Garmin avionics packaging to create Inlet Ramp/Prop Gov Foam Seal.  Vans is correct that a bandsaw works well for trimming outline per template provided.  Bonded into Top Cowl with hi-temp RTV per Sect 47-30, Steps 1-6.   Re-installed Prop Gov bracket assembly per Sect 43-07 [ ref: 9/64" allen wrench].   Next:  installation of Empennage Fairing per Sect 12-10 to 12-13 (completed Emp Kit back in Sept 2016 - but Emp Fairing is not supplied until Finish Kit...combined with other fiberglass parts).
-3B riveted.  
Can't install Bottom Cowl w/o extra long slot
...so Closeout gets installed normally
AFTER Cowl is on Fuselage


foam cut to template via bandsaw
Foam seals against Prop Gov, vs baffles on grey
Inlet Ramp.  bonded with hi-temp RTV. 
extra insures sealed at forward edge


re-installed Prop Gov bracket for control cable

Wednesday, August 22, 2018

Finish Kit

Bottom Cowl Closeout ( 2 hrs )

Riveted nutplates to Bottom Cowl Closeout after machine countersinking, priming and painting.   Also sanded with 320 grit the exterior of Upper and Lower Intersection Fairings, smoothing the light coat of epoxy applied yesterday.

Tuesday, August 21, 2018

Finish Kit

Intersection Fairings &  Bottom Cowl Closeout ( 4 hrs )

Final sanded Wheel Fairing new fillets, after 2nd pass on one cured.  Per Step 2, 46A-28, sanded inside Upper and Lower Intersection Fairings where they contact Leg Fairings, then applied light coating of epoxy.   Clamped Bottom Cowl Closeout to mark position, then drilled dozen #19 holes.  Started machine c'sinking rivet locations so I can add nutplates.
A lot of work, but turned out well.   Sanded a
bit off perimeter Intersection Fairing to
allow for paint thickness later.
Really like how the fillet smooths transition.
(realized after pic - the front is not all the way down w/o screws)

done...cleaned up along separation line.


sanded interior where contacts Leg Fairing, coated w/ epoxy.
While at it, applied thin coat to exterior...will sand off  most for
 smooth finish (had several filled spots wanted to "harden")
After marking while installed on Fuse,
re-positioned to drill.  Part way done
with #8 screws holding alignment


ready to add nutplates to alum Close Out 

Monday, August 20, 2018

Finish Kit

Intersection Fairing ( 4 hrs )

Steps 7-11 at 46A-27:  Sanded fillets smooth and flush to Intersection Fairings.  One was A-OK, other needed 2nd pass.  Very pleased with fit and appearance.  Next two pages are instructions for installing Wheel Fairings and related Fairings after paint...which I'll eventually do.  Skipped to start Bottom Cowl Closeout per 46A-30.  Deburred FF0003A and -3B.  Mounted with Cowl to begin marking position and holes to drill.
Sanded to flush w/ edge of Intersection Fairing.
Tape protects primer/filler on Wheel Fairing.
 

Tad Dah !   Really like how this worked.


Close up showing shape w/o Intersection Fairing

Saturday, August 18, 2018

Finish Kit

Lower Intersection Fairing ( 4 hrs )

Machine C'sunk Lower Intersection Fairings at ten holes per Step 1 at 46A-28.  Sanded Wheel Fairing surface about 1.5" outside Lower Fairing to prep for epoxy/micro balloons fillet.   Applied vinyl tape to edge each Lower Fairing, then slopped on thick mix creating fillet.  Smoothed as much as practical to reduce sanding later.  When partially cured to "rubbery" stage, cut slots along Fore/Aft split of Wheel Fairing.   I used micro-balloons to make sanding easier, but still will be a lot of sanding.
Sanded w/ 80 grit where mix will be applied
Vinyl tape covers edge -- to sand down to, 
but not through.   I decided to c'sink screw 
heads prior adding fillet, to make sanding easier
 w/o screws above surface.


prior to cutting slots where Wheel Fairing separates
 

Friday, August 17, 2018

Finish Kit

Intersection Fairings ( 2 hrs )

Step 4 @ Sect 46A-26:  added nutplates to Wheel Fairings  for Lower Intersection Fairings.   Took extra time to tweak holes to insure alignment maintained once nutplates installed.
prior to machine c'sinking screws
cut off remaining flange after pic..


Thursday, August 16, 2018

Finish Kit

Intersection Fairings ( 4 hrs )

Good news - the screws came out, and Lower Fairings separated.  Per 46A-1& 2: Mounted Upper Fairings back onto Fuselage, drilled #27 holes and machine C'sunk 5 holes each (all while under Fuselage - seeing more of bottom of plane than top lately).  Cut clearance for alum brake line in Leg Fairings to insure no rubbing/wear issue.   Started riveting nutplates to Wheel Fairings to hold Lower Fairings per Steps 3 & 4.   Wow...these Fairings sure do take some time.  The Finish Kit total hours exceeds any other sub-kit significantly.
cut clearance to aluminum brake line...LH side

and RH side...

lots of time under fuselage.  Selfie into bottom skin...

Machine C'sunk for screws while in place so
nutplates guide cutter

essentially done...  whew !

adding nutplates to mount Lower Fairings onto Wheel Fairings